Sunday, December 31, 2017

Thebans attack the Athenians - Six by Six conclusion.

Daughter against father.

In order to complete my Six by Six challenge I had to cash in my Father's Day present, that being that my daughter would play a game with me.  Maybe I should have picked something engrossing like War Between the States or at least Ligny, but no, it had to be DBA. 

I took my old Tin Soldier Hellenistic figures to make two armies, keeping things simple.  Daughter got off to a good start when she asked me if I painted them.  I said yes.  She said she was very impressed.  Hurray, maybe the army will live on after I'm gone.

 The opponent with her helper, Ulysses.
Yes he's a dog, but Gods do those disguise things.

Rather boring linear set up, but DBA 3.0 gives a lot more control over terrain - or not.   
If I recall correctly DBA 2 terrain set up was a bit less restrictive.

 We are closing in, 
employing the modesty blurring for the naked fanatics (Auxilia - Galatians hired by Athens).

 Contact.
The Theban God(dess) giving her troops the victory sign.

 The Gods are meant to look on, not lick on.  Whatever...

I won.
Daughter is claiming the new dice cup is actually a teleport device to transport her camp to safety.

And so finishes 2017 and the Six by Six challenge.  Phew, that was close.  

Nice finish as I started the challenge with a Supplementary Six by Six game of X-Files with my daughter (post).  

I had stretch goals (unrelated to Mark Woods):

  • Hordes of the Things (will count this as a win if I create an army)
  • Faustus Furius
  • Anything John Carter Warlord of Mars related
  • Napoleonic Naval (including Galleys and Galleons)

HotT was almost a win.  Could of done the chariots...  Sigh, John Carter.  But I think I did get in some Napoleonic Naval.

I even set myself some Honourable Mentions:
  • Fire and Fury
  • Blitzkrieg Commander
  • Crossfire
I achieved all three.

But the highlight of the year was none of these, it was playing War Between The States.  Thanks Simon!

Big thanks to Kaptain Kobold for running the Six by Six.  Wouldn't have happened without him.

The Mahdists are coming...

... along nicely.

Cleaned up. assembled and undercoated.

I first posted on these guys late December, 2014.  I didn't think it was that long ago, but three years these days ain't a long time.

Unfortunately I don't know the manufacturer of these figures.  I'm sure someone will tell me.

Recently they had started to inch towards my painting table.  With the hot weather I found myself unable to continuously paint, but could start fiddling with figures.  I'd also been doing a little bit of research aided by a cache of Osprey books and more recently a concerted effort to start indexing my Military Modelling magazines (which of course finishes before their article in 1985 on the Mahdists).  Luckily it was Pyjamas to the rescue.

What got me thinking I could actually paint this number of 28mm figures was this article by One man and his brushes. So rather than my usual black undercoat hand painted, I was going to try spray painting them with a white undercoat.

But before I could do that I was struck by indecision.  Should I base them singly (on 20mm square bases and use them for Songs of Blades and Heroes or similar skirmish type games), or should I base them for Impetus Basic Battles?  While it could still change I have decided to base them for Sands of the Sudan as that rule set's 100mm by 45mm base (of 7 to 10 figures) will fit within an appropriate troop type IBB base of 120mm by 60mm (just need to make a sabot).  These 30 figures will make four bases.

The figures cleaned up okay, only a few needed major work (drilling out a wad of metal cast between the legs on three of the drummers).  However now they are undercoated I see more mould lines I should have dealt with (hopefully a lick of paint will deal with them).

I very rarely use spray paint (except for varnishing) and had to get up early while it was still cool and not windy.  I used a Tamiya Flat White (which by a Xmas miracle had turned up in Stanbridges yesterday when it wasn't there on Friday).  It was a great relief when I found that the spray had worked.  There are numerous areas not adequately covered (which is why I normally do this step by hand), but which will be easily tackled in my next planned step which is the application of some light grey to the recesses.

It is possible I might get these figures finished next year.

Friday, December 29, 2017

WBTS via Vassal - Weeks 109 to 112

Just like the the combatants, I am determined to finish this to the bitter end.

So Burnside tries an assault on Vicksburg.  It is one the 161-200 Column of CRT 2.  Both sides lose 1,000 men.

The Union are only able to blockade Charleston, so the Confederates get 6 import supply.  They carry forward 110 and receive 60 from their remaining two major cities (New Orleans and Atlanta).  Towns and other cities gets them just 24.  Total 200.  That is plenty for 10 personnel points, but I've also determined that the Confederates need to be building fortresses as the Union naval power will be able to deal with forts with ease (i.e. they can muster enough strength to attack on the 900+ Column and do not have to worry about losses).

The Union are carrying forward 562 supply and get 250 from major cities.  Liberated cities gives them a further 63 from free towns and cities.  An embarrassing total of 875.  Some enterprising Northerners are suggesting that they should be allowed to trade with the South.

The Confederates commission 10,000 garrison troops.  The Union augment a 3-3 division to a 10-3 division, convert three lots of 2,000 militia to be three 2-3 brigades and raise 3,000 garrison troops.

The Union are finally able to launch one of their new Ironclads in St Louis.  The other one will definitely be finished next month.  It turns out the contractor was trying to sell them to a competitor.  A 10,000 strong division goes to Bowling Green.  Another one goes to Baltimore along with a railroad repair unit.  A 3,000 strong division is posted to Washington.  1,000 militia are raised in each of Kentucky and Missouri.  Hancock arrives in Washington and is given command of Pope's corps.

The Confederates receive 7,000 sorely needed militia that are returning to the cause.  There are 8,000 garrison troops that are distributed as follows: New Orleans 3,000 and Atlanta 5,000.  Partisans appear in Tennessee.  Walker and Ewell are promoted to Corps commanders.

The Confederates use 26 supply and 9 rail supplying their dwindling armies.  They are left with 154 supply, 21 rail.  50 supply is spent building a fort at Grand Gulf, MS.

The Union consume 54 supply using 18 rail.  They are left with 766 supply after they top up their existing depots.

Week 109

The Union start with the 6 free chit.

The new division is railed from Bowling Green to Skyes to continue the Atlanta bloodbath.

The new ironclad starts sailing down the Mississippi.

Heintzelman is ordered across the Nottoway River.

Franklin is ordered to join Thomas.

The new railroad repair unit is sent to Norfolk to reestablish rail transport from that location.

Sumner is sent off to deal with the partisans.

Reynolds advances to the Pearl River.

Rosencrans misses his opportunity to get the rebel militia that is blocking his way.  Halleck is no help.

Sickles advances to the outskirts of Bristol.

Pope decides to go to Fort Monroe.  Hancock goes to Baltimore.

McPherson attacks Wheeler on the 161-200 Column of CRT 3.  Both sides lose 2,000 men.

Sedgewick attacks Taylor on the 111-130 Column of CRT 3.  Both sides lose 2,000 men.

Rosencrans wriggles back across the Satilla River.

Sherman attacks Walker on the 201-250 Column of CRT 4.  It is a bloody defeat with the Union losing 5,000 men to the Confederates 2,000.

Porter attacks fort Sumter and obliterates the garrison.  This has been something I keep forgetting to do.  The Confederates would have been safe outside or better if they had upgraded to a fortress (they couldn't as there were no regular infantry units to provide the necessary engineers). This will only be a true success if the Union can follow up.

The Confederates are bleeding to death, but they are determined to make the Yankee's pay for their aggression.

5,000 men are rushed to fight Sherman, despite being served extra rashers of bacon for breakfast, 1,000 desert on the way.

Hardee is sent south with a 1,000 men to Natchez while Johnson takes over the garrison of Fort Grand Cliff.

Ewell sends 5,000 garrison troops to reinforce the fort at the mouth of the Mississippi.  He notes there are some regulars there and orders the engineers to start looking at plans to upgrade the fort to a fortress.

The militia facing Rosencrans are pulled back to the Altamaha River.

The Partisans raid Pulaski, threatening Sherman's supply lines!!!  Now the importance of Eastern Tennessee becomes obvious.  I also have to remember it is three movement points in rough terrain, not two for infantry (four for cavalry).  The presence of a railway line does not negate this (which is a bit odd).

A degree of glumness settles on the Confederates.  The Roanoke line is looking very thin, as is the Mississippi.  Atlanta is at risk as Georgia is being overrun.    Luckily there are 7,000 militia to deploy.

2,000 militia go to defend the Altamaha River line in Georgia.

1,000 militia go to Plymouth, NC to protect the most eastern part of the Roanoke River line.

2,000 militia go to Jackson, MI.

The remaining 2,000 militia are needed in Atlanta (only 2,000 militia can be called up per state per week - a Governor can only sign so many commission papers).

 Georgia and the new Altamaha River defensive line

Partisans in Tennessee threatening Sherman's supply lines.

Week 110

The Union get the 4 chit.  The Confederates get a double move.

The partisans have a free hand and cut the railroad and then head after the next line supplying Sherman.

Price returns to Raleigh, but orders the bridges and railway destroyed at Weldon and Gaston.

A slight redistribution of militia on the Altamaha line occurs, but everything else is pretty stable.

Taylor and Hindman destroy their bridges on the Roanoke line.

The Union High Command tells Sickles that capturing Bristol is urgent and that he then needs to secure the rail line all the way back to Chattanooga.  McClellan claims that he conquered Tennessee.

The brigade that was languishing on the Tennessee River is rushed to Tullahoma.

Sumner reaches the Tennessee, but it will be a few weeks before he can catch the partisans.

Hancock and 10,000 men sail to Norfolk, but it is possibly only a staging post.

Granger displays initiative to keep on moving and arrives at the banks of the Roanoke.

Franklin returns to Petersburg.  Thomas prepares another attack.

Meade sends 1,000 men from the Washington garrison to take over as the Stanton garrison.

Reynolds penetrates deeper into Georgia hoping to soon connect with Halleck.

Lyon finally crosses the Big Black River.

Couch makes a march attack on Forrest.  Both sides lose a 1,000 men.  Couch is wounded.

Lyon attacks Jackson (about time - it was tricky to get him over the Big Black) on the 131-160 Column of CRT 4.  He is defeated.  The Union lose 7,000 men, the Confederates 4,000.  They also don't have to retreat (a one in six chance).

Sherman attacks Walker on the 201-250 Column of CRT 4.  Both sides lose 2,000 men.  Sherman is very disappointed.

McPherson attacks Wheeler on the 201-250 Column of CRT 3.  Both sides lose 2,000 men.  That is a third of the Confederate force...

Sedgewick doesn't attack, but Thomas does hitting on the 91-110 Column of CRT 3.  Thomas plays it safe,  Both sides lose 2,000 men.

Week 111

The Union get the 4 free initiative chit again.

The partisans descend on Fayetteville, TN, but cause little havoc.

In the west Jackson wonders when he will need to pull back.  He and Forrest decide to hang on a little longer.

The same goes for Atlanta, but Walker knows he has no choice.

The Roanoke front is getting very thin.  Hindman sends 2,000 men to reinforce Taylor.

The Union get word to Halleck to go and rendezvous with Rosecrans (if he can meet up, Rosecrans will be freed from the limitations of naval transport).

Sumner is hurried along to get to grips with the partisans.

McDowell is ordered up to the Tennessee with the railroad repair unit.

Hancock is ordered to sail for New Bern and to take a railroad repair unit with him.

McClernand decides to send troops to Howard.

No other initiative is shown in the east.

Around Atlanta Sherman is happy with his position.

Ord realises he needs to go to Paducah where transports are waiting for him.

Farragut, now he has the new ironclad, bombards Vicksburg.  A 1,000 defenders perish.

Lyon attacks Jackson again.  It is on the 131-160 Column of CRT 4. Both sides lose 15% and Jackson has to retreat.

Sherman attacks again on the 201-250 Column of CRT 4.  This time the death rate is more to his liking.  The Union lose 2,000, the Confederates 3,000.

Hancock does a wriggle across the Neuse River.

McPherson attacks.  It is on the 251-400 Column of CRT 3.  Both sides lose 2,000 men, but that is half of the Confederate force...

There are no other attacks in the East.

Week 112

The Union draw the 7 chit.

Sumner eradicates the partisans.

McDowell repairs part of the railway near Decatur, AL.

Farragut attacks Vicksburg again.  The fort falls.

Buell is activated and shuffles troops about so Lyon can keep up the pressure on Jackson.

Union cavalry liberate Carthage and Louisville in Mississippi.

Halleck meets up with Rosencrans.

McClellan is ordered back to the Roanoke.  He tells anybody that will listen that he will crack the Roanoke line as soon as he gets there.

1,000 men are sent from Stanton to reinforce McClernand.

McPherson, sensing victory performs a march attack on what is left of the Confederates before him.  Both sides lose 1,000 men, but McPherson loses his life.

Heintzelman has the initiative to head over to McPherson's command and pay his respects.

Hancock repairs the railhead at New Berne and proceeds to the Tar River, throwing out a brigade to cut the railway at Rocky Mountain.

Lyon keeps up the pressure on Jackson, attacking on the 161-200 Column of CRT 4.  Both sides lose 3,000 men and Jackson has to retreat.  Forrest is now somewhat trapped in Jackson.

Sherman doesn't attack, but Sedgewick does.  He attacks on the 111-130 Column of CRT 3.  Both sides lose 2,000 men.  Taylor has a lucky escape when a bullet with his name on it hits his belt buckle and is deflected harmlessly away.

There are no other attacks.

The Confederates send reinforcements to Walker.

Forrest flees across the Pearl River.

Johnston sends all the troops he can spare to Jackson and then moves off south.

Smith is told to send Wheeler to Atlanta and to then pull back to Dalton where he will meet up with Hindman.

Beauregard decides to pull the Army of the Atlantic, all 33,000 men, back and go and meet Hancock.

The Roanoke Line is no more.

 Collapse in the East.

 Encirclement in Georgia.

The run of the Mississippi.


Casualties


With losses for the Union at 36,000 men and for the Confederates 41,000 men, you would have to be asking, is it worth it?


Tuesday, December 26, 2017

Napoleonic Russian Horse Artillery Uniform details from Military Modelling February 1976

This post was inspired by this post by Carlo which I came across when searching for uniform details for Mahdists.  It rang a bell that an article appeared in Military Modelling magazine on the uniforms for Napoleonic Russian Horse Artillery.  It took a bit of searching, but I found it.


If only there was a searchable index.  All this good stuff hidden away, so sad.

Napoleonic Austrian Artillery

As part of the Austerlitz project I decided to provide some Austrian artillery, specifically done and based for Napoleon's battles.

 This is what I was able to make out of one packet of Old Glory Austrian artillery.
Four As12# and six As6#, but guns for only six at a time.

 I really enjoyed painting the crew, 
although the artillery pieces themselves were a chore.

 I was concerned that getting a suitable brown for the jacket would be a challenge, 
but was very lucky to immediately hit on VJ Beige Brown 70.875.  
Over it I put a Citadel wash, the same one I use on the flesh.

 The different kit worn by the gunners was a bit tricky until I worked it all out.

 The gunners' seat I've added to the AS6# batteries, 
rather than let them languish in the spares bucket.

 The gun carriages are in Jo Sonja Deep Yellow with a black wash over the top.
The trim is VJ Oily Steel and the barrel Tamiya Semi-Gloss Black.


 I tried something different for the wood, settling on VJ Khaki Grey with a black wash.


So, I was very happy with these guys, hence the amount of photos.

The trouble I had with the guns was holding them to paint.  I ended up sticking one end in a peg and that worked okay, but not perfect.

Next up, Russian Horse Artillery.

WBTS via Vassal - Weeks 105 to 108

Will the Union progress the war with any vigor?  Let's see...

Only New Orleans is open to foreign imports which adds 3 to the 74 supplies the Confederates carry forward.  Major cities gives them another 60 and minor cities 50.  The total is 187.

The Union get 128 from liberated towns to add to the 280 carry forward and the 125 (which is an error, should be 250, at least according to 1st Edition charts) from major cities.  Total 658.

Both sides have 10 personnel points.  The Union however get 1 militia every month this year in Kentucky and 1 every even month in Missouri.

The Confederates raise 10,000 garrison troops.

The Union convert 10,000 garrison troops to a 10,000 man infantry division.

The Union ironclads are still not ready.  However plenty of Union troops are.  A river flotilla is launched in St Louis.  A 10,000 strong division goes to each of Bowling Green, Washington and Baltimore.  A railway repair unit also goes to Baltimore.  2,000 cavalry are received at Washington.  Rosencrans is given command of the newly formed White army which contains a detail of coloured marines.  The few militia in the Union army all decide to stay with the colours.

The Confederates muster garrison troops in Atlanta (5,000), New Orleans (2,000) and Raleigh (1,000).  A supply train is also created at Raleigh.   Hood, who the papers are calling the savour of the South, arrives in Atlanta to takeover from the recently deceased A Hill.  Price is promoted to command the Army of the South in Raleigh and Wheeler returns to duty and takes over Price's old corps.  There are no partisans.

The Union consume 51 supply using 16 rail, leaving them with 597 supply and 34 rail.  34 supply is distributed using 15 rail.

The Confederates use 27 and 11 rail.  They are left with 140 and 14 rail.  31 supply is dispersed using  a further 12 railway.

Week 105


The Union get the 2 chit.  The Confederates tell them they should give up.

Hood is ordered to stop Sherman.

Polk is ordered to stop Banks.

Wheeler is ordered to take supplies up to the Roanoke.

Beauregard further strengthens Taylor and Hindman sends some reinforcements to Smith.

There is no need for further adjustments.  The Confederates are confident they have the Union beat.

The Union rail Sykes and 10,000 men to reinforce Sherman.

The Union ship out Rosecrans and 11,000 men plus a railway repair unit and supplies bound for Brunswick.

Heintzelman looks for a way across the Nottoway while Pope and Meade stay chatting in Richmond.  Thomas prepares for another attack.

McClellan makes a dash for Bristol.  The rest of the Union Generals in the East either prepare their attacks, write their memoirs or letters requesting reinforcements.

Sickles joins the race to Bristol.

Sherman, now that Skyes has his back, starts an outflanking move on Hood.  Hood might be a good general, but he is not yet in charge of the Corps and has a limited command span.

Hooker and Halleck fail to react.  What are they waiting for?

Reynolds establishes a railhead at Mobile and then pushes north hoping to meet up with troops that Banks left picking cotton.

Finally Burnside gets on some boats and sails for Yazoo City.  He will arrive next week.

Lyon sends his cavalry to clear the train line that puts Buell's army back into command.

Ord keeps the garrison troops moving to Cairo, but a 1,000 drop out on the way.

Franklin returns to Washington having picked up 2,000 militia in Harrisburg, PA.

There are no attacks in the West.

Sedgwick attacks.  He catches Bragg without supply.  The combat is on the 201-250 Column of CRT 3.  The Confederates are able to hold their position, but lose 8,000 men.  The Union lose 4,000.

Thomas attacks.  It is on the 91-110 Column of CRT 3.  Both sides lose 3,000 men.

 The Roanoke Line holds

 The Tennessee races

The West where the war can be won or lost.

Week 106

The Union step up their game, picking the 4 free initiative chit.  Should the Confederates be worried?

Wheeler joins Bragg in trying to hold off Sedgewick.  D Hill is brought over to replace Taylor who is sent up the Roanoke to reinforce Smith (eventually).

Part of the Atlanta garrison is sent to cover the Chattahoochee River crossing to the south west of that city.

Troops are shuffled about at New Orleans.

Jackson and Forrest hold their positions by Vicksburg, as does Hood in front of Atlanta.

Price decides to take his new army, all 3,000 of them, north to the Roanoke.

In contrast, Rosencrantz and his new army of 11,000 men land at Brunswick.

Halleck is ordered to join him.

The troops Banks left in Alabama are told to meet up with Reynolds.  This means the rail line from Mobile now extends to Winchester.

Burnside disembarks and is sent to besiege Vicksburg.  Farragut looks at bombarding Vicksburg, but could really do with those extra ironclads that he has been promised.

Pope is ordered to send troops to Thomas and then report to Washington.

Granger has finished clearing out the last vestiges of rebels from the Shenandoah Valley and heads to the front, eager for further glory.

McPherson tries a sneak attack on Smith but it is to no avail.  Sedgewick sends McPherson some reinforcements.

Sherman sends out parties to clear his flanks, but decides to keep close to Sykes and his supply line (for now).  Hooker needs to coordinate with Sherman, but there is trouble getting messages through.

Reynolds prepares to cross the Pascagoula River.

Couch tries to force Forrest back, but is outsmarted and almost captured.  Lyon has initiative but no opportunity.  He needs McCook to come down and help, or Buell, or anybody.

Couch tries to attack again and this time Forrest retreats.

Sherman attacks Hood on the 161-200 Column of CRT 4.  The rebels lose 5,000 men, the Union 4,000.  Sickles narrowly avoids being wounded.

McPherson attacks Smith on the 251-400 Column of CRT 3.  Both sides lose 2,000 men.

Thomas attacks D Hill on the 91-110 Column of CRT 3.  Boths sides lose 4,000 men, but the Southern line holds.

Week 107

The Union get the 2 chit...

The Confederates order the militia holding Jacksonville, FL, to pull out.  A 1,000 desert in the process.

Buckner is ordered closer to Atlanta to protect against any sudden incursions by Hooker.

Price is order to reinforce D Hill, his troops, being garrison, will take a while to get there.

Taylor joins Wheeler.  But then Wheeler is sent to reinforce Smith.

Jackson is tempted to counterattack Couch, but is told not to.

The Union tell Reynolds to push on to Meridian, MI.

McCook is ordered to join Couch.

McDowell supervises railroad repair.

Nothing else moves in the West as armies are all in position to attack (mostly).

Rosencrans advances out of Brunswick, heading for Halleck.

Granger sends reinforcements to McPherson and then returns to Washington.

Franklin gets the 10,000 man division that is languishing at Washington and gets it moving south.

No further land movement occurs in the east.  However at sea, Porter takes the ironclad down to Charleston.

In a further bit of Northern frustration, no attacks occur against the Confederate Roanoke line.

Sherman attacks Hood on the 161-200 Column of CRT 4.  The fighting is bloody with the Union losing 4,000 men and the Confederates 5,000.  Hood is wounded and out of action for five months.

But that's the only attack.

Week 108

The Union get the 7 chit.

Reynolds is encouraged to push on to capture Meridian, which he does, drawing a long noose a bit tighter on the Confederates in the West.

The Railroad repair unit in Mobile gets to work.

Sumner is told to hurry south.

Halleck is pulled back (just so he can manage the isolation rules better).

Franklin continues his march with reinforcements towards the front.

Butler is ordered back to Washington, but he goes to Baltimore instead (I'm not sure if naval transports can enter Washington - is it on a river or the coast?  Regardless, Butler's boat was so grand it needed plenty of clearance).

Granger sails to Norfolk with the new cavalry division and will proceed to look for a way around the mouth of the Roanoke River.

Meade finally decides he's had enough of Richmond and returns to Washington.

Buell decides to attack Forrest on the march.  Forrest stalls him with ease, but has a scare when he finds a bullet hole in his hat.

Couch attacks Forrest.  Forrest decides to stand and fight.  The battle is on the 401-900 Column of CRT 3.  The Union fail to make an impression.  Each side loses 1,000 men.

Rosencrans makes an attack wriggle maneuver and crosses over the Satilla River.

Sherman and Skyes miss their opportunity to attack the leaderless Confederates covering Atlanta.

McPherson fails to attack, but Sedgewick does, hitting Taylor on the 111-130 Column of CRT 3.  Both sides lose 4,000 men.  The Confederate line holds.  Bragg is mysteriously killed in the fighting and Taylor is able to take command of his corps immediately.

Thomas doesn't attack.

The Confederates have some decisions to make.

Smith is directed to help D Hill.

The militia on the Satilla River destroy the rail line and slip away.

Walker is directed to takeover Hood's Corps and some reinforcements are sent with him.

Jackson shuffles troops around and that's it.

The Confederates have survived another month.

 The Confederates have successly held on to the defensive position behind the Roanoke River.

The race to conquer Tennessee is not yet finished.

 Atlanta is holding out.

Elsewhere in Georgia.

 The Confederates continue to hold out in Mississippi.

Banks has been snookered.


Casualties


Union's butcher's bill is 27,000, the Confederate's 33,000.  The cost of prolonging the struggle is fearful.


Sunday, December 24, 2017

WBTS via Vassal - Weeks 101 to 104

The war must go on!

Again no siege phase.  After last month's maneuvers I expect Richmond will be starved out this supply phase.

The Union naval blockade reduced Confederate import supply to just New Orleans and Savannah for a total of 6 points.  The Confederates carried forward 32.  Major City supply is reduced to just Atlanta and New Orleans at 30 supply each.  Town and minor city supply brings in 93 (from 31 still functioning locations).  Total is 191.  Personnel is 10.

The Union carried forward 67, have 220 from their cities and 171 from cities/towns returned to the fold: a massive 458.  Personnel is 10.

The Union augmented a 3-3 division to a 10-3 and converted 3,000 garrison troops to a small division for later augmentation.  2,000 militia were converted to a 2,000 man brigade for a possible later merge in the field to replenish a division.  It is going to be all about maintaining a flow of reinforcements from now on.  The Union are left with 430 supply points.

The Confederates commission another ironclad and raise 9,000 garrison troops.  That leaves 113 supply.

The Confederates receive a supply train that goes to Atlanta and 10,000 garrison troops that spread 4,000 to Atlanta and the rest evenly between Vicksburg, Raleigh and New Orleans.  There are no partisans.

The Union receive a supply train that goes to Bowling Green along with a new 10,000 man division.  A second 10,000 division goes to Philadelphia and a 1,000 man brigade goes to Washington.  The ironclads are still undergoing fit out in St Louis.

Burnside constructs a fort opposite Vicksburg which will possibly put that place out of supply, certainly the Department of Kentucky and Tennessee that is based there.  The Confederates relocate it to Jackson, MI.

Reynolds is given command of the newly created I Corps in Philadelphia and Sykes receives the VI Corps in Bowling Green.

In Atlanta, 2,000 militia decide it's time to go back to their farms.  In Virginia, 1,000 militia decide to do the same thing.  At least a fort was built in Natchez for half price.

The Union require 48 supply using 15 rail to support their armies.  They have 312 left and 30 rail.  They distribute 31 supply using 14 rail.

The Confederates require only 27 supply but use 13 rail.  They have left 86 and 12 rail.  The use their remaining rail to restock empty supply trains in the East.  That Holmes surrenders Richmond to General Meade is greeted with disbelief by President Davies.  To cries of "Fake News!"  and "The South Will Never Surrender" the Confederate Congress hurriedly re-establish themselves in Raleigh where they discuss the possibility of turning the slaves into soldiers to fight for the freedom of the South against the Northern aggression.  During the debate they receive news that President Lincoln has signed the Emancipation Act.  Southern Senators are heard to mutter into their mint juleps, heavily laced with whiskey, "bu.. bu.. we thought of it first."

Richmond's fall gives the North 10 political points.  The Emancipation Proclamation gives the South 5 political points.  The war is no closer to resolution, although Union cartographers have been studying the mouth of the Mississippi and find that there are quite a few...

Week 101

The Union get the 3 chit.

The Confederates have Hindman and Price switch positions and get the replenished supply train to Hindman.

Walker sends A Hill the new supply train.

Troops are marshalled in New Orleans to be sent to Brashear after the Confederates read about "The Many Mouths of the Mississippi" in the New York Times.

Every other Confederate command holds their place. The Confederates will not lose the war, the Union have to win.

The Union order Banks to Mobile.

Reynolds with 9,000 men and a Railway Repair Unit sets sail for Mobile.

One of the brigades from Sherman's army is sent into east Tennessee to rally Federal patriots.

Granger gets his act together and gets on with clearing the area around Romney of any lingering rebel sympathisers.  Franklin in Washington carefully arranges the pens and pencils on his desk.

McClellan sulks as he wasn't invited to the surrender of Richmond party.  He fans the flames of fake news by suggesting Richmond hasn't really fallen, because if it had, he would have been there.

Sedgewick closes in on Bragg (the wrongly labelled Johnston).  Howard doesn't follow and McClernand cautiously brings up supplies.  McPherson wants to move on Smith, but the roads are against him for a march attack, but maybe later...

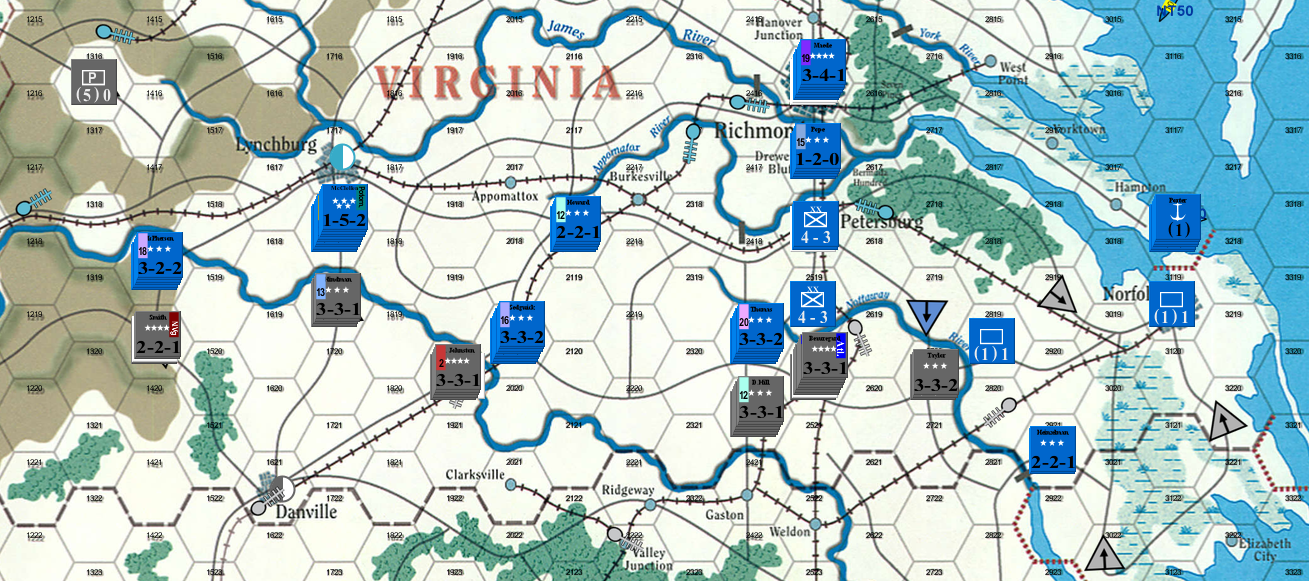
Thomas, Meade and Pope are all busy processing the surrender of Richmond.

Heintzelman is stuck in Norfolk.  He doesn't have enough suitable men to undertake any offensive actions.  Butler is furiously writing his acceptance speech on the sure certainty of his being elected the next President of the United States.

Halleck moves to the Flint River.  Hooker is told to hold his position north of Columbus, GA.

Sickles fails to receive orders.  Sherman prepares to attack.  Sykes is busy looking on the map to find out where he should go (to join Sherman!).

Ord is busy inspecting the garrison at Fort Island No 10 and doesn't appreciate he needs to get those troops to Cairo for processing.

Sumner, with considerable troops (25,000) in Memphis is another general who fails to understand the need for action.

Crouch (in the previous report erroneously referred to as Curtis), with his 12,000 men plus supply train, completes his voyage to Yazoo City.  However he just doesn't quite make it this week.

Lyon loads his cavalry on to a river transport and sends them off to Buell while taking a fast steamboat to immediately join Buell's stalled army and try and see if he can shake things up a bit.  Buell sends 5,000 men to Yazoo City to prepare for Crouch's arrival.

Burnside is stuck on the western bank of the Mississippi with 21,000 men, but transports will soon be available.

Lyon attacks the Confederate Army of the Mississippi on the 131-160 Column of CRT 4.  It is going to be bloody, but it wasn't.  The Union lose just 2,000 men to the Confederates' 3,000 as they hurriedly retreat.  Both Jackson and Johnson narrowly avoid being wounded as their troops stampede for safety.

Sherman attacks A Hill on the 91-110 Column of CRT 4.  Again a bloody encounter is expected, with both sides using supplies, but losses are Union 2,000 to the Confederates 3,000.  Still, being in the mountains the Confederates are able to hold their position.

McPherson fails to attack.  But McClernand does, hitting Hindman on the 111-130 Column of CTR 2. Both sides lose a 1,000 men but the Union fail to cross the Roanoke River at this point.

Sedgewick doesn't attack, but Thomas does.  In a disaster Beauregard is caught without supplies.  The attack goes in on the 161-200 Column of CRT 3.  The encounter is bloody with the Rebels refusing to give ground.  7,000 Union troops are lost, but the bill for the Confederates comes in at a staggering 14,000.  Breckinridge narrowly avoids becoming a casualty.  After all that the Confederates decide it is best if they voluntarily retreat across the Nottoway River.  Thomas doesn't advance (he wants to keep Pope's troops under his watchful command).

77,000 Southerners facing 132,000 Northern aggressors.

In the West it is 44,000 Confederates facing 83,000 Union.

Elsewhere the numbers are about equal, but quality tends to be with the Union as a good amount of the Confederates are garrison troops.

Week 102

The Union free initiative slips to just two.  The Confederates believe that this lack of Union initiative will allow them to win the war and so they keep on fighting.

First Ewell in New Orleans is told to send troops to stop any Yankee occupation of Brashear.  The Confederates are horrified to see 1,000 men take this as an opportunity to desert.

Hardee is ordered to slip out of Vicksburg.  He takes half the garrison with him.  The ironclad moves out to cover this move.

On the central front Buckner is ordered to protect Macon and Walker sends troops from the Atlanta garrison to occupy Newman (which Bruckner vacated).

The final Confederate free initiative is to pull Taylor back from covering Norfolk.

Bragg wisely decides to pull back.  He has 25,000 men but no supplies.  At least the Roanoke now offers some protection.

Beauregard is still in shock after his disastrous defeat, but D Hill has the presence of mind to send him some reinforcements and supplies.

The Confederates have a case of too much brass and not enough grunt around Vicksburg.  Jackson, now he is over the Big Black River, seizes all of Polk's and Magruders men and brings them into his army.  Johnston doesn't object.  Jackson now has 29,000 men.

The Union high command order Sykes to send supplies and reinforcements to Sherman.

Banks is ordered to get the 3,000 men he has in Mobile to Brashears which Federal sympathisers advise is still unoccupied.  His arrival is like a cat amongst pigeons, but will he just curl up and go to sleep?

Reynolds commences to round Florida on his voyage to Mobile.

Lyon licks his wounds after beating Jackson.  Meanwhile cavalry and Crouch (who I now realise I should have been calling Couch) now arrives.  Buell stirs into action, trying an outflanking manoeuvre.  A flotilla masses to prepare to ferry Burnside over the Mississippi.  Sumner is stuck in Memphis, but McDowell is going back to help him.  Ord continues to conduct uniform inspections.

Sickles sends more troops to Sherman and then heads off to finish the conquest of Tennessee.

Hooker moves towards Atlanta.  Halleck ponders what to do.

McClellan decides to join McClernand, who, along with McPherson and Howard are so spoilt for options that they appear to be unable to do anything.    Add to that Sedgewick, Pope and Meade.  Only Thomas gets off in pursuit of Beauregard's defeated army taking two division away from Pope in the process.  Heintzelman gets in the action advancing up to the Nottoway River and securing most of the crossing points with his rattag force.

Sedgewick does an attacker wriggle and moves up to the Roanoke.

McClernand attacks Hindman on the 131-160 Column of CRT 2.  Both sides lose 2,000 men, but the Confederates hold firm.  (Aside: I might not have done the allocation of losses correctly.  The result was 10% loss on the attacker which is 2,000 before halving total attack strengthen for attacking across river.  It would be 1,000 if done after halving.  At this stage I have gone with the greater number in order to shorten the war.)

Neither McPherson, Thomas or Sherman attack.  At this rate the war will go on forever.

 Buell's outflanking manoeuvre.

The thinning grey line.

Week 103

The Union again get the 2 chit.  The Confederates declare this as an outstanding victory.

The Confederates tell Johnson to get his army sorted.  He sends Polk and Magruder with their empty corps to New Orleans.  He then goes and joins Hardee.  Forrest is moved to block Buell.

Beauregard pulls his army back to behind the Roanoke.  The Confederates believe it will take the Yankees a while to realise they have gone.  Bragg is ordered to send 9,000 to reinforce Hindman.

The rest of the Confederates have a rest.

Sykes sends the remaining troops he has collected to Sherman who now has 36,000 men.

Thomas is ordered off in pursuit of Beauregard.  He plans to strike the weak force under Taylor who is covering Beauregard's right.  There is no display of any initiative whatsoever by any of the Union generals in Virginia.  Maybe they are getting ready to attack?

The generals in around Atlanta do nothing, it is hoped that Sherman will at least attack this week.

Banks amazes everyone by crossing the Grand River.  This puts him within striking distant of the Mississippi, if only he can keep his fingers off the cotton.

Couch gets across the Big Black River.  But he's the only one to do anything out West except for Sumner who goes off with 25,000 men to inspect the railways.

Couch attacks, but Forrest retreats before combat.

Both Hooker and Halleck force their way across the Flint River, but this comes with a risk of them being isolated.

Sherman attacks!  Both sides use supply and the combat is on the 161-200 Column of CRT 4.  The surprisingly timid result sees the Union lose 2,000 men to the Confederates' 3,000.  The Confederates stay put in the mountains.

Neither McPherson or Sedgewick attack, but Thomas does.  It is on the 251-400 Column of CRT 3.  Both sides lose a 1,000 men, but nothing changes.

The crossing of the Flint.

Banks' advance.

Week 104

In another victory for the Confederates the Union just get 3 free initiatives.

Beauregard reinforces Taylor.

A Hill is reinforced from Atlanta.

The collection of generals in New Orleans try to get a force together to face Banks.

The Union general Reynolds arrives in Mobile and sets about ordering supplies from Fort Pickings.

Hooker is ordered back across the Flint.

Sumner is ordered south, repairing the railway as he goes.

The final order is to Howard to join up with Sedgewick and try and force a crossing of the Roanoke.

All the Generals in the West do nothing except for Ord who has now finished reviewing the garrison of Fort Island No 10 and marches them to Union City.

Halleck liberates a large stretch of Georgia for little military purpose.

Sickles enters Knoxville.

McPherson makes a hurried attack on Smith and both sides lose 1,000 men.

McClellan decides to go down into Tennessee to claim credit for its capture (which now seems imminent).

Meade and Pope are still hanging around Richmond on what has been a four week hiatus.

McPherson now makes a deliberate attack on Smith.  It is on the 251-400 Column of CRT 3.  Both sides lose 1,000 men.

Thomas attacks Taylor on the 131-160 Column of CRT 3.  Another loss of 1,000 men per side.

Sherman attacks on the 131-160 Column of CRT 4.  The Union lose 5,000 men to the Confederates 4,000, but one of those Confederates was General A Hill.

The Confederates seem to be successfully holding the line of the Roanoke thanks to Union tardiness.

The rush to conquer eastern Tennessee.

Halleck goes on a tour of Georgia while Sherman does the fighting.

Mississippi where the Confederates are also doing well in the face of further Union tardiness.

Casualties


10,000 Southern patriots were imprisoned following the fall of Richmond.

Apart from that the Confederates lost 35,000 men in what is a long drawn out war of attrition.

The Union lost 25,000 men in what was a very lackluster period for them.


Friday, December 22, 2017

Never Call Retreat


I have now finished Bruce Catton's trilogy of the ACW completed on the centenary of that event.  I slowed down my reading of the final book, first to try and keep pace with my War Between The States game and secondly because I was enjoying the book so much I wanted to make it last.

My reading of the fall of Richmond did coincide with that event in my game, but I've still got a way to go (having failed to immediately go after New Orleans when I started the game).  The book stops quiet suddenly with Lincoln's assassination which is rather poignant. 

I would have liked a summary of what happened to all the key players after the war, particularly Sherman.  Luckily I have Wikipedia to help me out.

I'm currently watching the Ken Burns directed show The Vietnam War and there are possibly some interesting contrasts with that Civil War that the Americans stumbled into and then what seemed to become a political war rather than a military war.   So much destruction.  So much that could have been averted if wiser heads had prevailed (perhaps).

Having now read this trilogy I'm for leaving the statues etc in place, locking up those that would pervert them for their own causes/mischief, and educating us all so we can learn from the actions and mistakes of the past, in particular understanding the context in which  decisions were made.

I am very pleased that I have finally been able to read this set of books.  I can remember buying them many years ago and hoping that one day I would get them read.  I was also really pleased to be able to play War Between the States at the same time as it took both activities to a higher level of appreciation and enjoyment.


Austerlitz OOB - Comparison of Bowden vs Goetz

I'm probably over doing this, but the comparison is relatively easy to do, and so, why not...

French


General Bowden Goetz
Grande Armee Napoleon (4) (4)
Imperial Guard Bessieres (2) (2)
Infantry of the Imperial Guard
1st Brigade Hulin  16FrOG 16FrOG
2nd Brigade Soules 16FrOG 16FrOG
3rd Brigade Lecchi - -
Cavalry of the Imperial Guard
1st Brigade Ordener 12FrGHC 12FrGHC
2nd Brigade Morland - -
Artillery of the Imperial Guard
1st Company  FrG8# FrG8#
2nd Company FrG8# FrG8#
Royal Italian Guard ItG8# ItG8#
Grenadiers de la Reserve Oudinot (1) (1)
2nd Brigade Dupas 20FrGN 20FrGN
3rd Brigade Ruffin - -
Duroc (1) (1)
1st Brigade Laplanche 16FrGN 16FrGN
1st Corps Bernadotte (2) (2)
1st Infantry Division Rivaud (1) (1)
1st Brigade Dumoulin 16FrLN 28FrLN
2nd Brigade Pacthod 24FrLN 12FLN
2nd Coy 3rd Reg Fr6# Fr6#
2nd Infantry Division Drouet (1) (1)
1st Brigade Frere 20FrLT 20FrLT
2nd Brigade Werle 28FrLN 28FrLN
3rd Coy 3rd Reg Fr6# Fr6#
3rd Corps Davout (2) (2)
2nd Infantry Division Friant (1) (1)
Advance Guard Bierre 24FrLN 24FrLN
1st Brigade Kister - -
2nd Brigade Lochet - -
1st Coy 5th Reg Fr8# Half Fr8# Half
4th Dragoon Division Bourcier (1) (1)
1st Brigade Laplanche 8FrLC 12FrLC
2nd Brigade Sahuc - 12FrLC
3rd Brigade - -
3rd Coy 2nd Reg Fr8# Half Fr8# Half
4th Corps Soult (2) (2)
1st Infantry Division St Hilaire (1) (1)
1st Brigade Morand 12FrLT 12FrLT
2nd Brigade Thiebault 24FrLN 28FrLN
3rd Brigade Vare 28FrLN 28FrLN
2nd Infantry Division Vandamme (1) (1)
1st Brigade Schiner 12FrLT 12FrLT
2nd Brigade Ferrey 28FrLN 28FrLN
3rd Brigade Candras 24FrLN 28FrLN
3rd Infantry Division Legrand (1) (1)
1st Brigade Merle 20FrLT 16FrLT
2nd Brigade Fery 16FrLN 28FrLN
3rd Brigade Lavasseur 24FrLN 20FrLN
4th Corps Light Cavalry Division Margaron (1) (1)
1st Brigade Margaron 12FrLC 8FrLC
4th Coy 5th Reg Fr8# Fr8#
3rd Dragoon Division Boye (1) (1)
1st Brigade Boye 20FrLC 12FrLC
2nd Brigade Scalfort - 8FrLC
3rd Brigade Milhaud - -
3rd Coy 2nd Reg Fr8# Half Fr8# Half
4th Corps Artillery Reserve
17th & 18th Coy 5th Reg Fr12# Fr12#
5th Corps Lannes (2) (2)
3rd Infantry Division Suchet (1) (1)
1st Brigade Claparede 12FrLT 12FrLT
2nd Brigade Beker 24FrLN 24FrLN
3rd Brigade Valhubert 20FrLN 20FrLN
1st Infantry Division Caffarelli (1) (1)
1st Brigade Demont 20FrLN 20FrLN
2nd Brigade Debilly 20FrLN 20FrLN
3rd Brigade Eppler 12FrLT 12FrLT
2nd Dragoon Division Walther (1) (1)
1st Brigade Sebastini 12FrLC 12FrLC
2nd Brigade Roget - -
3rd Brigade Boussart - -
2nd Coy 2nd Reg Fr8# Half Fr8# Half
Corps des Reserve Cavalerie Murat (2) (2)
1st Heavy Cavalry Division Nansouty (1) (1)
1st Brigade Piston 20FrHC 20FrHC
2nd Brigade La Houssaye - -
3rd Brigade Saint-Germain - -
4th Coy 2nd Reg - Fr6# Half
2nd Heavy Cavalry Division d'Hautpoul (1) (1)
1st Brigade Noirot 16FrHC 12FrHC
2nd Brigade Saint-Sulpice - -
4th Coy 2nd Reg - Fr6# Half
Light Cavalry Brigade Milhaud (1) (1)
1st Brigade Milhaud 8FrLC 8FrLC
1st Corps Light Cavalry Division Kellerman (1) (1)
1st Brigade Van Marisy 16FrLC 8FrLC
2nd Brigade Picard - 8FrLC
1st Coy 3rd Reg Fr6# -
5th Corps Light Cavalry Division Fauconnet (1) -
1st Brigade Treillard 12FrLC 8FrLC
2nd Brigade Fauconnet - -

Nothing too dramatic and a few are just different allocation of regiments to brigades.  As Napoleon's Battles is a brigade level (which includes large three battalion style regiments) ruleset I tend to prefer when adapting actual OOBs to NB to preserve brigade structures where possible.  This has become easier with the 4th Edition that readily caters for small units (less than 16 figure infantry and 12 figure cavalry).  Of course this is something that can be actually configured to the individual figure, but that would mean starting off with loss markers in some cases and there is already plenty of counters and labels to deal with.

The main thing that I might change is the preponderance of half batteries of horse artillery.  Something to test out as well as research in my reading up on the battle.

Allies

General Bowden Goetz
Combined Russian and Austrian Army
The Tsar Alexander I (4) (4)
Commander of the I. II. and III. Columns Buxhowden (3) (3)
Commander of the Austrian Contingent Liechtenstein 1 (-) (-)
Advance Guard of the I. Column Kienmayer (1) (1)
1st Brigade Carneville 24AsGZ 20AsGZ
2nd Brigade Stutterhiem 8AsLC 8AsLC
Artillery As6# As6#
Artillery As6# -
3rd Brigade Nostitz 8AsLC 8AsLC
4th Brigade Moritz 8AsLC 8AsLC
I. Column Dokhturov (1) (1)
1st Brigade Lewis 20RsLN 28RsLN
2nd Brigade Urasov 24RsLN 28RsLN
3rd Brigade 16RsLN 28RsLN
Artillery Rs12# Rs12#
II. Column Langeron (1) (1)
Viborg 16RsLN 16RsLN
Kursk 16RsLN 16RsLN
Perm 16RsLN 16RsLN
Fanagoria 16RsGN 16RsGN
Ryazan 16RsLN 16RsLN
III. Column Preobreshensky (1) (1)
1st Brigade Muller III 20RsLN 20RsLN
2nd Brigade Strik 12RsLN 28RsLN
3rd Brigade Loshakov 12RsLN 20RsLN
IV. Column - -
Russians Miloradovich (1) (1)
1st Brigade Berg 12RsGN 12RsGN
2nd Brigade Repninsky 12RsLN 24RsLN
Artillery Rs12# Rs12#
Austrians Kolowrat (1) (1)
Austrian Brigade Rottermund 28AsLN 28AsLN
Austrian Brigade Jurczik 24AsLN 28AsLN
Austrian Brigade 24AsLN -
Artillery As12# As12#
Artillery As12# -
V. Column Liechtenstein (2) (2)
Austrian Cavalry Hohenlohe 2 (1) (1)
1st & 2nd Brigade Caramelli/Weber 12AsHC 12AsHC
Artillery As6# As6#
Russian Cavalry Essen II (1) (1)
1st Brigade Penitzki 12RsLC 12RsLC
Constantine Uhlans - 16RsLC
Cossacks - 12RsCLC
2nd Brigade Uvarov 20RsLC 20RsLC
Elisabetgrad Uhlans - 16RsLC
Cossacks 8RsCLC 8RsLC
Artillery Rs6# Rs6#
Artillery Rs6# Rs6#
Artillery Rs6# Rs6#
Advanced Guard Bagration (1) (1)
1st Brigade Dolgoruky 16RsJG 16RsJG
2nd Brigade Kamensky II 16RsLN 16RsLN
3rd Brigade Engelhardt 28RsLN 16RsLN
4th Brigade Wittgenstein 16RsLC 16RsLC
5th Brigade Voropaitzki 20RsLC 20RsLC
Res Cavalry - 12RsLC
Cossacks Chaplits 12RsCLC 12RsCLC
Artillery Rs6# Rs6#
Artillery Rs6# Rs6#
Artillery As6# -
Artillery As6# -
Russian Imperial Guard Constantine (2) (2)
Infantry of the Guard Maliutin  (1) (1)
1st Brigade Depreradovich 28RsGD 28RsGD
2nd Brigade Lobanov 16RsGD 28RsGD
Cavalry of the Guard Kologrivov  (1) (1)
1st Brigade Jankovich 12RsGLC 12RsGLC
2nd Brigade Depreradovich II 20RsGHC 20RsGHC
Artillery RsG6# RsG6#
Artillery RsG12# RsG12#

Not too strikingly different, but there are four extra cavalry units, and an extra 18 infantry bases.  A few less guns and one Austrian infantry unit excluded.

My preference remains to treat these as two OOBs and hopefully play the game a few times seeing what difference the OOBs make.

The real challenge is getting the terrain determined along with the starting positions etc.