Monday, December 31, 2018

More Armour and a bit of rebasing

Just to finish off what has been a very successful wargaming year, here is some more finished kit for North Africa along with a start are rebasing some existing figures.

First up, Zvedza's PzIII.  It's a beauty!


Next we have Zvedza's Stuart.  Another terrific kit.  Putting on the stars was a pain, doubly so when one broke off when I was doing the final dry brush.  I decided to paint it on, as you can see.


The we have Zveda's Lee Tank.  More of a challenge and the 37mm gun broke on both my models.  I ended up replacing them with a thin nail.


These 8th Army figures came from Simon who got them off eBay.  I have just touched them up a little and used plaster to cover their bases so that they are no longer seen as standing on little islands.


Now we have the start of the major rebasing project.  Just a test case, all I have to do is add a top colour.  So, as far as rebasing goes, this is simple simple.  I've included a base still to be done (top left hand corner) for comparison purposes.


That's all for this year.  I will be back next year. 
Meanwhile all the best and a happy and safe New Year to you all.


Stalin's Revenge - Operation Bagration

I never realised that the annihilation of Army Group Centre 1944 was so dramatic and so quick.


I picked up this book at the club while playing Stalingrad.  The donor seemed to think it was appropriate that I have it.  As an aside it is so sad that books are losing their value.

It is a short book, less than 200 pages, of which about 70 are appendices.  Strangely I read the appendices first, as they covered the weapons and OOB.  The included photos and maps provide context, although the maps don't always include the places mentioned in the text.  This is a minor point as it would be better reading it with some separate maps, perhaps even from a boardgame to get a good feel for things.

It is short on eye witness accounts (compared with the Beevor books for example), however I think this is understandable as most participants didn't survive the conflict.  The death toll was horrendous.

Again, some ideas for scenarios, or rather context to some of the generic breakout, encirclement, type games included with Blitzkrieg Commander and Rommel.

I did appreciate Tucker-Jones attempts to put the battle in a wider context as clearly it was a massive victory, but strangely not well covered/known (overshadowed by events in western Europe and then subsequently in Poland with the Warsaw uprising).  While Kursk and Stalingrad were tipping points, the Soviets still had a long way to go to have Stalin's revenge.  This battle sure provided that.


Sunday, December 30, 2018

The Caucasus 1942-43

Having twice played the GMT boardgame back in August and September 2014 I finally got around to reading the Osprey book on the campaign.


However the motivator really was that I am currently playing the computer game Hearts of Iron IV online with my friend Bruce (he's Italy and I'm Germany).  HoI IV deserves its own post, but suffice to say we had progressed the invasion of Russia into the Caucasus and things were getting difficult, so I thought I would read up about it (the book was conveniently readily to hand).

Standard Osprey format which can't really be faulted, especially when it is remembered that there are plenty of ancillary books to go with the subject (i.e. on uniforms, weapons etc).

Inspiring artwork, gets me wondering if a series of games for Rommel could be developed.  I expect it would be interesting, but it will have to wait as I need to focus on North Africa.

Back on the Caucasus, all that effort for almost no oil thanks to Soviet's destroying the oil facilities as they retreated.  I wonder how that compared to Iraq?


Saturday, December 22, 2018

Stalingrad - The Factory

Stephen asked to play this game.  I was quite happy to oblige.  He went Soviets and I went Axis.

 The setup, with everyone hidden.

 A German platoon uses a crossfire to successfully clear one building.

In the factory a couple of brave Soviet squads are ambushed moving into another sector. 
They are wiped out.

The Germans set up another crossfire.

With their losses skyrocketing, the Soviets try an all or nothing attack in the factory.

They won!

After throwing crap dice throughout the game, Stephen plucked victory from defeat in taking the factory, against significant odds.  Well done!

Sunday, December 16, 2018

Operation Brevity

My first game of Rommel where all the figures/models are close depictions of the troops they represent.  Stephen went the Axis and I prevailed as the Commonwealth using my superior knowledge of the rules and lucky die rolls (or rather Steve's unlucky die rolls and it was really only his first game with the rules).

 Operation Brevity is one of the introductory scenarios for Rommel.
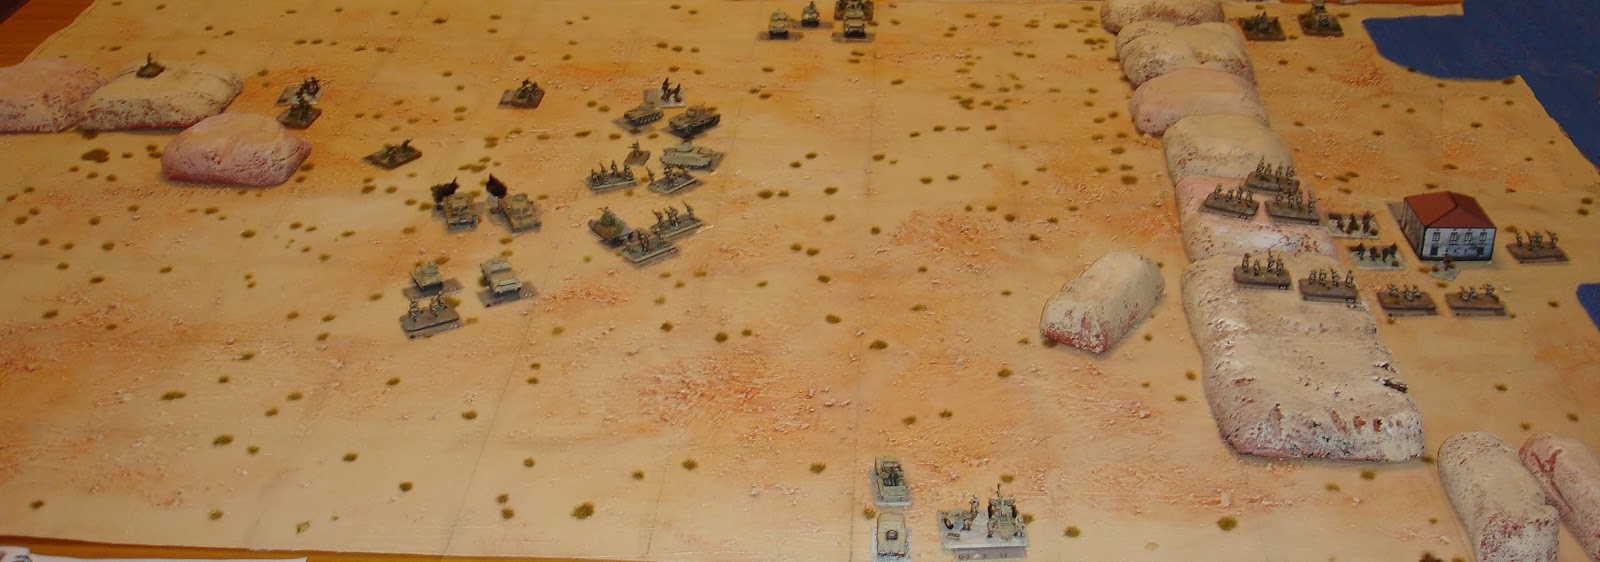
Here is our setup showing some associated game paraphernalia,
which I crop and edit of of subsequent photos.

 The Commonwealth are attacking and I have sent the Coastal Force to attack Sollum,
while 7th Armoured Brigade Group covers the left flank 
and the 22nd Guards Brigade Group the centre.

A bit of additional research has produced the following names/locations for the objectives: Sidi Azeiz (top left - single figure on the ridge), Fort Capuzzo (centre, just taken by 7th Armoured), Sollum (the solitary building on the right) and Halfaya Pass (held by the Commonwealth, bottom right hand corner). 

To win the Commonwealth need to capture two of Axis objectives and still hold Halfaya Pass.

 7th Armoured had seized the centre objective (where the single figure is pointing),
but immediately come under counterattack.

 In a crafty move the 7th withdrew from the centre objective,
only to strike at the Axis infantry coming up behind.
Meanwhile fighting has commenced around the outskirts of Sollum.

 The fighting at Sollum is not progressing well.
However in the centre there is a real cauldron of bubbling action,
(which accounts for the blurred photo).

 The 22nd have now taken the centre, 
while the 7th in a most ungentlemanly move,
have blocked the Axis lines of communications.

 The Axis launch another counterattack in the centre.
At Sollum, Coastal Force supported by the 22nd,
 have driven the Italians back into the "urban" area.

 Even though surrounded, the Italians fight on heroically.

 Axis reinforcements have arrived and hope to drive off the 7th Armoured.
The Commonwealth have dug in around the centre,
their batteries and line of communication,
just to be safe.

 Sollum is still holding out,
however the Commonwealth are throwing back all the Axis counterattacks in the centre.

 Losses are mounting.

 At Sollum both attackers and defenders are being bled white,
down to their last numbers (of men).

 The loss in German armour has been severe.

 Sollum has finally been taken.
In the centre another round of Axis counter attacks have been repulsed.

 The Commonwealth, in control of Sollum and the centre, sit tight as night begins to fall.

The Axis try one last time to take the centre,
but the Matildas of 4RTR have been superb at defending against the attacks.

I think I can say I have now got the hang of the rules and was able to do some pretty effective things with the forces I had available.

The grey labels are due to a printer malfunction.  I also think I could make those for the armour a bit smaller.

Friday, December 14, 2018

Nikephorian Byzantine versus 100 Years War English

The club was down due to a power outage, but I was able to get Graham to come to my place so we could have our Impetus League Game.  This gave me the advantage of home turf which served me well.

 The English had to deploy first, which gave me an advantage.

 I started advancing right away, including spreading out.

 By turn 2 we were in bow shot, with both sides scoring hits.

 The English Hobilars (on my left) have routed after sustained missile fire.
On my right my elite light cavalry have engaged his knights.

 Turn 4 and both units of English knights are in trouble.

 With the enemy cavalry dispersed, my advance can now continue.

 Turn 6 and we are closing in.

In the ensuing excitement I forgot to take photos, but it was all over pretty quickly.  The English longbow did some damage, and their foot followed up with a charge.  While it pushed my centre back, it failed to break them, leaving them exposed, particularly on my left, where I was able to make a flank charge.

Doh!

However that pathetic roll (need 6s or double 5s to score a hit), was just a minor embarrassment as my left hand legion (red tunics) smashed into the compromised English and they collapsed.  I was down two units (supporting archers - 4 points).  The English army was worth 22 points.

Monday, December 10, 2018

More Armour for the Western Desert

I've been playing the highly addictive Hearts of Iron IV, but have still been able to progress my Italians for Rommel as well as a few other AFVs for the desert.

 This cute little baby is the Zvezda Pz II.  
It went together extremely well.
Applying the PSC transfers was a challenge,
but they seem it give it that little extra bit of life.

 This is from the Battlefront boxed set of five 
which can be made up as either M14/41 or Semovente
I needed two tanks.

 And three Assault Guns.
The variety in stowage and command figures was a nice touch.
And they came with transfers, although most can't be seen.

 But I did go to the trouble of applying the rear licence number.

These five models were all plastic and went together well, although not as well as the Zvezda models.  They had a Tamiya brown undercoat and then a VJ Desert Yellow top coat that I then decided to give a black wash to, which I am really pleased how it turned out.  There was then a light dry brush of VJ Bluff to finish them off.

 Next is the Battlefront Matilda, half resin, half metal.
Having the hatch open was fiddly.

 This Battlefront Cruiser had the option of an open hatch and that was much nicer.

 Now we have side by side comparison of the Battlefront Cruiser with the Zvezda Cruiser.
Both are painted the same  (brown base, desert yellow and then dark sand),
but compared to the Italian armour they look a bit washed out - must have been the flash.

 Top down view shows that the Zvezda detail is finer which however is a bit lost,
unlike the suspension detail which is very crisp in the previous photos.

Final shot of the Italian armour, trying to mimic the box set artwork.