Thursday, July 30, 2015

Julian goes to Plancenoit

Yesterday, in a bit of a tight schedule, Julian from the ANF was able to join me a in game of Napoleon's Battles based on the attack of the Prussian IV Corps on the French VI Corps which was defending Plancenoit.  As Julian had not played the rules before I basically took on the running letting Julian roll the dice for the Prussians and giving overall directions.  His direction was simple - Go to Plancenoit.

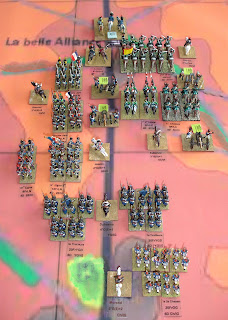
The deployment of the French forces available for the scenario.  Napoleon is there just to facilitate tracing command. The order of battle is straight form the Waterloo scenario I put together with the aid of Mark Adkin's The Waterloo Companion and some insight into the 4th Edition of Napoleon's Battles that facilitates small size units (or rather doesn't require amalgamations into minimum 16 infantry and 12 figure cavalry units).  

14:00 and Lobau moves his corps to face the Prussians who have just arrived.

15:00 turn and both the 15th and 16th Prussian Brigades (division equivalents) are heading down the road to Plancenoit in march column.

The French are ready, with the cavalry of the 3rd and 5th Division on react.

15:00 The Prussians start to deploy out of march column as their artillery starts to arrive.  The entry point for everything is Lasne.  The woods, streams and roads are critical given their effect on the Prussian's options.  Care needs to be taken to leave meaningful gaps (particularly noticeable when juggling between 16 and 20 figure infantry forming column and the latter finding that it can't get through a two inch gap).

The 107e Ligne have got to a wood to try and block the Prussians moving down the road while a brigade of the 19th Division has moved into the Fishermont wood with a similar aim.

The French cavalry is position to make the first of a series of devastating charges on the congested Prussians..

Julian encouraged me to attack with the 107e.  Being a small unit they were quickly wiped out.  However the remainder of the French 20th Division formed a good roadblock, particularly with cavalry support close by.

This was the disasterous move for the Prussians as in trying to deploy they had put their cavalry out of command.

The French cavalry are ready to take on the Prussian cavalry which is stuck in march column.  The 20th Division has repelled the Prussians threatening Plancenoit.

17:30 turn and the Prussians have stalled.

At this point Julian had to leave, encouraging me to finish it solo.


At the end of the 18:00 turn the French cavalry are making some desperate charges to delay the Prussians.

The death ride of the 5th Cavalry division, eventually dispersed due to winners losses - lucky for the Prussians.

Lobau's corps starts to fall back.

By 19:00 the 20th Division that was blocking the road has been eliminated and the Prussians look like they have their act together to push on to Plancenoit.

Napoleon has dispatched the Young Guard (this happened in the 18:30 turn when the Prussians were with 1,200 yards of Plancenoit - more or less).

Blucher was working hard rounding up units.

The 3rd Cavalry, supported by a brigade from the 19th Division (the other one is still holding the Fischermont woods) make a coordinated attack to buy time for the Young Guard to deploy.

The attack achieved its aim, but the 3rd Cavalry Division has almost ceased to exist as a fighting force.  

The Prussians come on.

The Young Guard hold Plancenoit supported by one brigade of the 20th Division (the other one is still fighting in the Fischermont wood)..

The Prussians are bearing down on the French, but time is running out (this is the end of the 19:30 turn)

20:00 and the Prussians, while in overwhelming numbers, have trouble bringing their weight to bear.

20:30 time is slipping away and still the Prussians are not ready to attack.

21:00 darkness is falling, one Prussian brigade is ready to go in.

The last turn and Blucher leads a regiment of Silesian landwher in a determined assault.

There he is, waving his pipe - doesn't he know subjecting his children to passive smoking is dangerous?

The Prussians get shot up going in, but use a Free Roll to change that.  Then then use their second and last Free Roll to change an adverse close combat result to something more favourable.

The combat continues and this time the Prussians get a decisive result...

The French use a Free Roll and the result is a tie (the Prussians were on +4 and the French on +5)

A tie result with such high modifiers causes three casualties per side which routs them both... DRAW

In all the excitement I now see I failed to add in +1 for the French commander.  The combat would have gone to a third round with both sides with one casualty.

Double whoops - that 5 9 die roll outcome would have been a 10 all tie and the Prussians would have routed at that stage.  I should have attacked with two units.

The critical thing seems to be handling the Prussian initial deployment with perhaps less haste.  Having Blucher and von Bulow is a significant advantage that the Prussians need to exploit.

The other thing to watch for is the terrain, particularly giving yourself enough room to deploy.
Sunday, July 26, 2015

6mm Basing Dilemma

Challenges!

How to come up with a basing regime that will work for Napoleon's Battles, Blucher and Baccus?

These are some 6mm figures placed on the 15mm Napoleon's Battles bases (3/4" by 1" for infantry, 1" by 2" for cavalry and 1 1/2" by 1" for artillery).  This is what I've done in the past (or rather did in the beginning before switching to 15mm figures).

The fit with the Baccus 60mm by 30mm basing seems reasonable.

The cavalry just would need to be on 1" squares - something I would probably do for my 15mm figures anyway if I had a free hand.

Putting such bases on a bigger 3" by 2" base for Blucher provides plenty of options to depict unit capabilities.  This would mean mounting the smaller bases on magnetic sheet and using metal big bases - something I'm set up to do for my 15mm figures.

Then I thought, why not go for 20mm by 30mm or just call an inch 30mm...

At least I am not tackling this challenge alone.  Mark B is also looking at how to base his 6mm Austrian army.  Here are some of his pictures lining them up on a 3" by 2" base.


I would much rather go with a single large base to avoid fiddliness, but I also like the flexibility...

A single large base allows for interesting dioramas...

This is a good post on the subject as well:

Do I really need to base my 6mm army for Napoleon's Battles?

Hill and Orange

Completed two Corps commanders for my Napoleon's Battles Waterloo army.  Lord Hill uses Battle Honors figures and the Prince of Orange uses AB Miniatures.  For the ABs I drilled out the reins, but apart from that the figures are as they came.


Getting a nice dark shade of blue was a challenge.

The Prince is a one piece casting.

The aide (actually a hussar officer) accompanying the Prince was used to test out some more blues, most notably on the portemanteau which I painted a number of different ways, including using a white base coat.

An orange highlight to the red coat gives it more of an officer's scarlet look, but the burgundy shade I used for the sash didn't provide a very distinctive crimson colour, but it will do.

Saturday, July 25, 2015

Stakes and Burgundy

My my Burgundian Ordonnance army has been a long time coming.  I started building it in the heady days of WRG 7th Edition as something totally different to my Hellenistic force.  This week I expanded the original longbow unit and more importantly, provided an abundance of stakes.

What was once 16 figures on four bases is now 18 on six bases.

These archers are Tin Soldier and date from before I started using a black undercoat.  The two new figures are quiet noticeable with their black outline.  There would be 20 years between when the first figure was painted and the latest two additions.

The stakes.  Hopefully more than I will ever need.

The pointy end of the affair.  The stakes are nails pushed through holes drilled in drink stirrers which have been cut and trimmed to base length.  The base was then built up with plaster and painted to look like turned earth and flocked round the edges.  The wood effect is thanks to a special wash/ink supplied by Mark W and applied over a white base - I am very happy with the result.

Thursday, July 23, 2015

Bombing Practice

Stephen and I are in a PBeM Wings of Glory game which is a bombing mission so we thought for tonight's game we would get in some much needed practice.

It got off to a very bad start when my Hannover CL.IIIA collided with one of the Sopwith defenders (flown by Greg).

Then he got on my tail - I had dived so even though our bases overlapped we were still able to exchange fire.

Everyone is shooting.  The target seems a long way away.

Ah ha!  Escaped and ready to begin my bombing approach as the two other German bombers flown by Stephen zero in as well.  The Sopwith flown by Mark B is in flames while the one piloted by Mathew hangs back, hoping to get us on the return.

Stephen's bombs fall wide and worse he is shot to pieces with Greg getting the killing blow.

I dived down to 2,000 feet and dropped my bombs.  Mission accomplished, but would my plane make it back?

Stephen's second bomber is shot down, but not without getting revenge with Greg's plane blowing up.

I do a sharp turn for home and my plane falls apart under the stress (two steep moves in a row necessitate the drawing of a damage card which took me over the limit of my planes endurance).  Note the "10" which was caused by the collision.

I think Mark B's flaming Sopwith survived and Matthew was doing fine with only one hit.

Out with the unofficial leader-board.  I attributed both of Stephen's deaths to Greg.  Mine was self inflicted, but I didn't give myself any credit for it.