The Union supply is 160 plus 14 from captured towns etc. They have 50 personnel points.
The Confederate supply is 60 plus 6 from seaports (the Union blockade bit this turn) and 74 from towns. They have only 10 personnel points.
The Confederates are limited by their counter mix from building any more 10-3s, which is a bit of a blessing as they only have a 4-3 and a 3-3 to augment. They create two 8-3s and lay down an ironclad. This leaves them with 62 supply.
The Union augment two 3-3s and a 4-3 to 10-3s, convert 14 militia to two 3-3s and two 4-3s, raise a 2-4 cavalry division, 8 militia, one garrison and a supply train. They are left with 41 supply.
The Union deploy a 10-3 in Cairo, Washington and two in Baltimore, a 4-3 in Cairo, a 3-3 in each of Evansville, Cincinnati, Philadelphia, St Louis and Washington. They have 10 militia they can call up later. The ironclad at St Louis is still not finished.
The Confederates deploy a two 10-3s in each of Richmond and Memphis, with a 4-3 going to New Orleans and Raleigh, and a 3-3 going to Little Rock and Charleston. A 2-4 cavalry goes to Memphis. They have 2 militia to call up later. They can raise three corps HQs. They elect just to raise two, a cavalry corps for Memphis and a spare infantry corps in Richmond. Partisan activity might start up again in Tennessee, but there are no partisans anywhere at this time. The Confederates start building a fort at Pittsburg Landing, but just spend 10 points. It is not built yet. They have 52 supply left now.
The Union recruit Hooker and Pleasanton to the cause and can create up to six new corps. Pleasanton gets a cavalry corps in St Louis, Grant gets a corps in St Louis, Hooker gets a corps in Baltimore, spare corps go to Cairo, Baltimore and Washington. The Union still haven't completed the fitout of the ironclad in St Louis.
The Union consume 37 supply that leaves them with just 4. They use 7 railway. They put their supply into the Baltimore depot.
The Confederates consume 27 that leaves them with 25 supply. They use 6 railway. I've just realised that the garrison of Wilmington has been isolated for two cycles now and so it surrenders (loss of 2 factors). They distribute 7 supply to top up Lee's Supply Train.
Missouri militia appear in St Louis and Kentucky militia in Columbus.
Hearing that the Union are planning another volunteer call to replace the troops lost with Burnside, the Confederates threaten to appeal for foreign intervention. Should the Union make the call it would put the Confederates on their best chance of winning at this stage. A 1 in 6 chance of outright victory, a fifty percent chance of Foreign Intervention (war would end mid 1864) and a 1 in 3 chance of Missouri or what is left of it, going to the Confederates. If this appeal failed they can immediately try again.
This is quite brilliant.

I had never given this much thought, but now I see it is very effective and elegant. The ACW was incredibly complicated in its politics. Not that I am anywhere near being an ACW scholar, I am enjoying reading Bruce Catton's trilogy as I play this game. In mid 1862 there were issues around getting more volunteers in the Union. In the game the Confederates have one political point up on the Union which puts them on the -1 column. If the Union make a third call for volunteers that will put the Confederates on the -3 column and is enough to give me, as the Union player, pause for thought.
However I know the Confederates are running out of men quicker than the Union and so it might just be a matter of time to wait them out.
Very clever game mechanic.
Week 45
The Union start with the 3 chit.Damn, I just realised I moved Thomas last turn with his supply wagon off-road during a winter turn. So it goes. It was one hex along a railway and at the end of winter so I'm not going to try and reverse it. As a result I decided to order Thomas back to Union City.
Sumner is ordered to march attack the rebels in Springfield, MO. Both sides lose a factor.
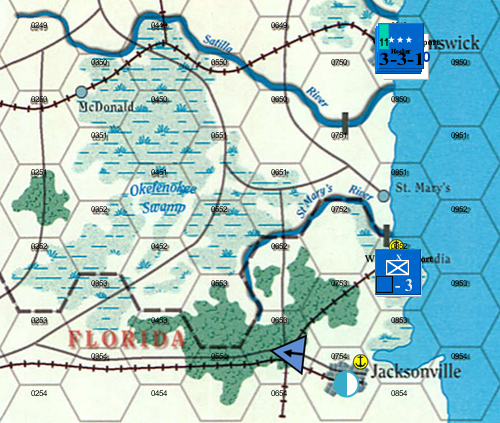
The next initiative must be spent in the East and goes to Hooker who embarks on a naval expedition. First he sends a division from Baltimore to strengthen the troops along the Potomac. He then embarks the other division and sails down to Georgia. The navy prepare three possible landing sites: Jacksonville, Brunswick and a location near Savannah. Porter heads to Norfolk with the ironclad and a transport with supplies is sent down after Hooker. His destination is Jacksonville, but how can I hide that from the Confederates?
Curtis displays initiative and occupies Wilmington.
Heintzelman displays initiative and blows up the bridge he is guarding over the Potomac. McClernand and Keyes look on and wonder if they should do the same.
Banks starts to march on Chattanooga. Crittendon thinks he should do something, but doesn't and Halleck writes letters demanding that Grant joins him immediately.
McDowell reviews the troops needed by Thomas in Cairo.
Pleasanton gets off to a good start, sends reinforcements from Alton to Cairo by rail (thus rectifying a problem that had occurred when the Department of the Mississippi had relocated). Buell does nothing (I think he is waiting till he is an army commander), but Grant gets on a boat to join Halleck.
Pope does nothing in Rolla, wondering if Sumner is going to attack. He doesn't.
Militia are raised in Pittsburgh, Baltimore and Washington.
The Confederates bring their newly restocked supply wagon up to the Potomac and move Beauregard to it and await a rendezvous with Lee.
Lee doesn't disappoint, moving promptly to join his compatriot, but leaving a division behind in Alexandria. Magruder is ready and sends on two divisions to Lee who now has 75 strength points under his command. Stuart positions himself so he can make a strike against Pittsburgh.
Johnston and Bragg decide to stay in Richmond. They have to guard the capital in case of enemy landings. They know Hooker is afloat. A Hill holds Raleigh and Buckner Charleston. Van Dorn and Floyd likewaise enjoy New Orleans.
Hardee is undecided and does nothing.
Jackson retakes Humboldt and then waits for reinforcements from Memphis, but D Hill and Huger are bickering about who should give the order so nothing happens.
Price and Polk in Springfield are a liability. Price thinks of evacuating but realises he can't leave Polk (who has a corps now denuded of troops).
Will Lee attack across the Potomac?
No.
Week 46
The Union get the 3 chit again.Sumner is ordered to do a march attack on Springfield. The Confederates withdraw their cavalry knowing (after a careful reading of the rules) that their leaders and corps counter will be able to retreat after the remaining troops are eliminated. The withdrawal of the cavalry (all 2 points of it) leaves just the supply train in the town and in the path of Sumner. Sumner takes the Springfield with ease. Price and Polk level spiteful accusations at each other over the loss of Missouri.
McDowell is ordered to join Thomas and takes a short sails down Mississippi to join him in Union City.
Keyes is ordered to send his big division to support Heintzelman who faces Lee's coming massive onslaught. It will be up to militia to defend Hagerstown.
McClernand, now the Union have calculated that it will be difficult for the Confederates to advance out of the Shenandoah Valley without the rail junction at Manassas being repaired first, takes the initiative to send one of his 10 strength point divisions to Heintzelman. The later now has 50 points to face Lee's 75.
McClellan is busy writing lengthy dispatches to Washington demanding urgent reinforcements. These dispatches take up so much of his time that he does nothing else.
Curtis, who is now desperately needed back north to create a diversion sits put in Wilmington. Perhaps the Confederates have damaged the port facilities.
This leaves Hooker who is sailing to Jacksonville. Unfortunately news of the perilous situation on the Potomac doesn't reach him. He lands in Jacksonville, FA.
Surprisingly, Banks, a 1 initiative general, continues his march on Chattanooga. Perhaps he has a train to catch? No, but it will serve as a Union supply centre.
Crittendon wonders what is up as Grant arrives at Halleck's HQ. Halleck wants to know what took him so long. Grant is dismayed that he will have to put up with this pettiness for the next 15 weeks (without a break). It's enough to drive anyone to drink.
Thomas welcomes McDowell, but does nothing else.
Buell in St Louis does nothing. There are optional rules for Union commanders that have Buell doing nothing except soaking up troops. He seems to be doing this quite nicely.
Pope sends the cavalry that was in Rolla to join Pleasonton and then takes the last train to Nashville with the Railway Repair Unit. Pleasonton sits down and writes a very nice letter to Pope briefly summarised as "thank you for the much appreciated intercedence in the hastened despatch of the aforementioned cavalry".
The Union deploy militia to Washington and Hagerstown.

Peril on the Potomac
Lee is given the go ahead to cross the Potomac. Magruder is sent to join Beauregard in protecting Lee's line of communications (a euphemism for line of retreat).
Stuart remains in the mountains trying his best to look threatening.
Again Johnston and Bragg decide not to move from Richmond. No one else along the coast is required to do anything, or even has the troops to do anything with.
D Hill sends reinforcements to Jackson who waits for them.
Hardee still can't decide what to do.
Polk and Price are still having angry recriminations over the loss of Missouri.
All hope rests with Lee.
Lee attacks Heintzelman on the 131-160 column of CRT 4. He uses two supply, the Union don't require any. He throws a one. Normally that would be a disaster, but after allowing for Heintzelman's combat modifier, Lee can still adjust the dice roll by two and that gives him the best outcome - 5% casualties versus 10% casualties (a loss of 4 versus 5) and most importantly the Union have to retreat. Just to keep things nerve wracking, both generals roll low on the leader casualty table, just scraping into the "no effect" outcome.
A bold move would be for Heintzelman to retreat across the Potomac to Leesburg, but he can't do that because it would mean crossing a river into an enemy zone of control, one of the few situations that stop a retreat. Instead he moves towards Baltimore and Lee advances and starts rebuilding the bridge.
The Confederates deploy militia to Aquia Creek, fearful of a Union landing in the rear of Lee's forces.
Week 47
Zero free initiative for the Union.The Confederates act quickly, ordering Beauregard to get the bridge at Leesburg repaired and then to move to cover the valley. He also arranges for the subsequent passage of a supply train to Lee while sending an empty one back to Manassas. Stuart is ordered to join Lee, positioning himself with his cavalry corps in Frederick from where he has even more potential to do a lots of damage to the Union.
Magruder stays south of the Potomac to cover Lee's rear.
Johnston is able to send a division north to support the grand offensive.
Hardee comes to a decision and starts a forced march to Columbus, MI.
Jackson decides Thomas is too tough to attack now and moves to threaten Halleck, but also positioned so he can strike against Thomas if he follows.
Polk takes his empty corps and heads to Little Rock.
Van Dorn thinks he should be doing something, but ends up doing nothing.
Everyone else excitedly waits for news of the fighting north of the Potomac.
Lee doesn't attack.

Maybe Lee is waiting to see what the Union will do?
Keyes moves south of Gettysburg to try and block the Confederate cavalry. He will need help. None is forthcoming from McClernand. Or McClellan. Or Heintzelman.
In a breath taking development, Curtis loads his division at Wilmington on to naval transports and sails to West Point. Even though it was thirty years ago he still knows his way around and promptly lands in the port and starts to march towards Hanover Junction. He'd be there too except there is a guard on the bridges over the James.
Porter fires up the boilers and takes the ironclad up the James River and destroys the railway bridges before he runs out of ammunition and sails back to Fort Monroe.
Not to be out done, Hooker sends a brigade on a force march to capture Fernandina while sailing to disembark and capture Brunswick.
Halleck, Crittenden and Banks are stunned by the news coming from Washington and spend all the time reading the papers and do nothing else.
Pope arrives in Nashville and then realises he needs some supplies.
Thomas sends a small garrison to Nashville, calls in militia and dispatches some in a forced march to Humboldt where the railway line is then cut. This seems to be aimed at enraging Jackson and getting him to turn round. McDowell could help but doesn't. Two factors are lost in these maneuverings.
No one does anything in Missouri.
Curtis tries to use rule [26.12] "Attacker Wiggle" to attack the notional Confederate force blocking his way, but fails to get attack initiative.
Heintzelman attacks Stuart. Stuart being all cavalry retires. A small Union division is sent to seal the gap.

The Main Game
McClellan has an army HQ with two cavalry divisions which forms a Zone of Control
that will block Stuart from just walking through that way

The Diversion
Johnston has a division and provided the Union don't go first,
he will be able to cover Hanover Junction and repair the other bridges.
The Florida Fringe
A side show, except that it's a tightening of the noose.
Week 48
The Union get the zero chit again.
The Confederates order Johnston to repair the bridges and then send a brigade to occupy Hanover Junction. The small division at Raleigh is then railed there to at least give him parity with Curtis.
Hindman on his own initiative abandons the Peninsula and moves to block Curtis. His forced march of his small garrison force results in one loss.
Buckner thinks about sending his division in Charleston north, but doesn't. Understandable given the Union's presence in Brunswick.
Van Dorn and Floyd sit oblivious in New Orleans. Rumour has it that they, Floyd at least, are busy trading with the enemy, cotton for salt.
Hardee pauses in his march.
Jackson is furious that he can't carry out his plan to attack Halleck and returns to Humboldt launching a march attack to push the Yankees out. Both sides lose one but the Union don't retreat.
D Hill in Memphis displays some initiative and rails and force marches a small garrison to Pittsburg Landing.
Price lingers outside Springfield, MO. Polk lingers in Dover, AR.
Back in the East, Stuart does a march attack on the Union division blocking his way. On the 131-160 column of CRT 1 with a plus or minus two modifier he can not fail but to push them back. Maybe Jackson should have done his attack at lower odds...
Lee attacks Heintzelman on the 161-200 column of CRT 4. Lee uses 2 supply and inflicts 10% casualties (4) on the Union, losing 5% (which also works out at 4). The Union have to retreat. Lee stays put.
Jackson is so irate he totally loses it and forgets to attack.
McClernand retakes Harper's Ferry for the Union. This is insignificant although such actions can have an impact later on. Heintzelman fails to move as does McClellan, the only two Union generals north of the Potomac who are in a position to hinder Lee's inexorable advance. Keyes slips off to Baltimore where he can take command of one of the idle empty corps waiting there.
Curtis doesn't have the supply lines to breakthrough, so he sweeps right up to the gates of Richmond (as he has been transported by water he is not permitted to put himself out of supply, not that this would be a good idea in the last turn of the cycle). He splits off a brigade from his division to help clear a retreat path back down to Fort Monroe and is able to amalgamate it back into his division almost immediately.
Hooker destroys the railway at Brunswick and then gets back on his boats and starts to sail around Florida (secretly headed for Mobile).
Banks is paused on the banks of the Tennessee, a short distance from Chattanooga.
Halleck sits immobile by the Tennessee, totally oblivious to the danger he is in. Crittenden is no better.
Pope is itching to get on with repairing the railway lines in Tennessee, but has no supplies. Such repair work would possibly save Halleck a lot of future complications.
McDowell and Thomas do nothing in Union City.
Pleasanton does a march attack on Price and both sides lose one cavalry casualty. I am sure Price would like to retreat, but I can't find a rule that would allow him to do that. Sumner watches all the dashing cavalry action, but does not try and help.
There are no further attacks, not even wriggles.

The East

The south east coast

The Gulf
or, as General Hooker calls it "Ripe for the picking"

The West and the Far West
Casualties
The Confederate's lost 14 to the Union's 12. This is not a good outcome for the South.
Fascinating read!
ReplyDeleteThank you. I must say I am finding it a very exciting game and that it is playing really well solo. It is getting into an interesting phase as both sides are down to a trickle of manpower, unless they make an additional call and that would give the other side a political advantage. If Lee's offensive fails, and I now have my doubts about its likelihood of success, the Confederates will be in big trouble (the Union can match the current Confederate builds and still have a few extra to cause trouble... )
DeleteI reckon the excitement factor has kicked up a notch or two with Lee's endeavour, at Matyland's expense, to obtain shoes for his men. But when in week 47 I read 'Lee doesn't attack' I went 'Aaargh! What the hell?!' It seems that activating commanders can be problematic...
ReplyDeleteAll commanders have an initiative rating. The worst are zero, e.g. Butler, the best a 4, e.g. Lee. You either need a free initiative to move them or they need to roll their initiative number or lower on a six sided dice. Then for combat they need to roll again. I think the Confederate average is 3 and the Union 2. Also, if the commander and or their forces have been transported by water they can not be given a free initiative. Add to this the random free initiative pool which allows, in the current period, the Confederates to always have 2 free moves and the Union do a lot of nothing. The Confederates have a lot to do, but not enough to do it with.
DeleteA rather blunt system, but it works well simulating the vagaries of various generals performance. It also works really well for solo playing - the best plans get thwarted or advanced unexpectedly leading to constant reappraisals of options.
Intriguing situation compellingly told! Brilliant stuff.
ReplyDeleteIt sounds like an attacker with sufficient advantage gets to alter the casualty die rolls, is that correct? If so, Pax Romana uses that system, and I was wondering where it came from. I think it's an excellent mechanism, and works really well for large armies where leadership is a force modifier.
Looking forward to more!
Cheers,
Aaron
Thank you.
DeleteAll commanders have a combat rating that varies from 0 (e.g. Butler) to 3 (e.g. Lee). The difference between the leaders ratings in a combat can be applied by the higher to modify the die roll up or down by that difference. It makes a big difference unless you can at least match leaders. The normal combat outcomes can be quiet harsh and being able to adjust is quiet significant. It comes at a risk of leader casualty. In the original 1977's edition this risk was prohibitive (a one in six, but the loss of a leader is very significant), but with the latest rules (2016) it only occurs on a 2,3 or 4 on a 2D6 roll and then there are save rolls and just the risk of being wounded and out for a number of turns (as has happened to Lyon and Longstreet in the game so far). I'm not using all the optional and experimental leader rules (in part because the Vassal module currently doesn't support them, but also because I had enough change to cope with in playing this game with the 2016 rules from the recent face to face game that used the 2005 rules).
Many thanks, just found the rules on the Limey Yank Games website and will have a browse through.
DeleteThe only thing missing for you will be some, or rather most, of the charts. Most can be guessed at, but the CRT tables are rather complex and out of the ordinary. The results are generally percentage loss for both attacker and defender. The attacker can choose the intensity, up to their rating. The ratios are fairly narrow, only getting significant when you are attacking with more than 200%. But except for when you get to 900% there are no decisive outcomes. Often a victory can see the attacker lose more (like a 10/20 outcome on the 250 column which has what has happened in week 51 which I'm yet to post). Great game given that it is 40 years old.
Delete2, 3 or 4 on 2D6 is the same odds as a 1 on 1D6. But its sounds as though you get a wider range of outcomes, from WIA through to KIA (or MIA i.e. POW?).
DeleteLOL I never realised that. It doesn't seem to be occurring all that much.
ReplyDelete[28.2] Leader Loss Table Roll 2d6 and consult the table below:
Dice Result
2 Four or five star leader or any leader in command of an army headquarters: roll again. On a roll of 2-5 the leader is killed; On a roll of 9-12 the leader is wounded; On a roll of 6-8 there is no effect. If the leader is wounded, roll two dice again to see how many strategic turns the leader is out of action.
3 Three star leader or any leader in command of a corps headquarters: roll again. On a roll of 2-6, the leader is Killed; on a roll of 7-12 there is no effect.
4 Three star leader or any leader in command of a corps headquarters: roll again. On a roll of 2-6, the leader is wounded; on a roll of 712, there is no effect. Two star leader not in command of a headquarters: roll again. On a roll of 2-6, the leader is killed; on a roll of 7-12, the leader is wounded. If the leader is wounded, roll two dice again to see how many strategic turns he is out of action.
5-12 No effect.
My problem is I started using this without realising the Vassal module doesn't have the two star leaders labelled (plus I didn't go with that experimental rule or the one for untried leaders). Pity, but there was only so much change I could cope with.