Wednesday, July 18, 2018

Dark Age Reinforcements

I've only ever had enough Dark Age stands to create a few DBA armies, but since fielding my 28mm Vikings as a Basic Impetus army, and more importantly committing to play in the club's Impetus league, I thought I better see if I can field an Viking army in 15mm.

On the workbench I had a hodgepodge of Dark Age figures that I have been working on for at least 10 years. Sadly I can no longer remember or recognize the brands, even if I ever could.

Time to get them, or at least some of them, finished.

 Seven standard WRG bases will provide me with two units of Viking raiders.

 I really needed eight stands, but I have spare I can add to boost the number.

 These guys were going to be Light Foot (LF) but I recalled they are really meant to be close order and having eight figures that is how I based them up.  So they are Heavy Foot (FP).

 They are suitably generic, apart from the rather distinctive early German shield pattern.

 You can never have too many camp elements.  This one is going to fill in for some heavy foot.

These guys will be sitting out the battle.

France 40 - Operation Dynamo

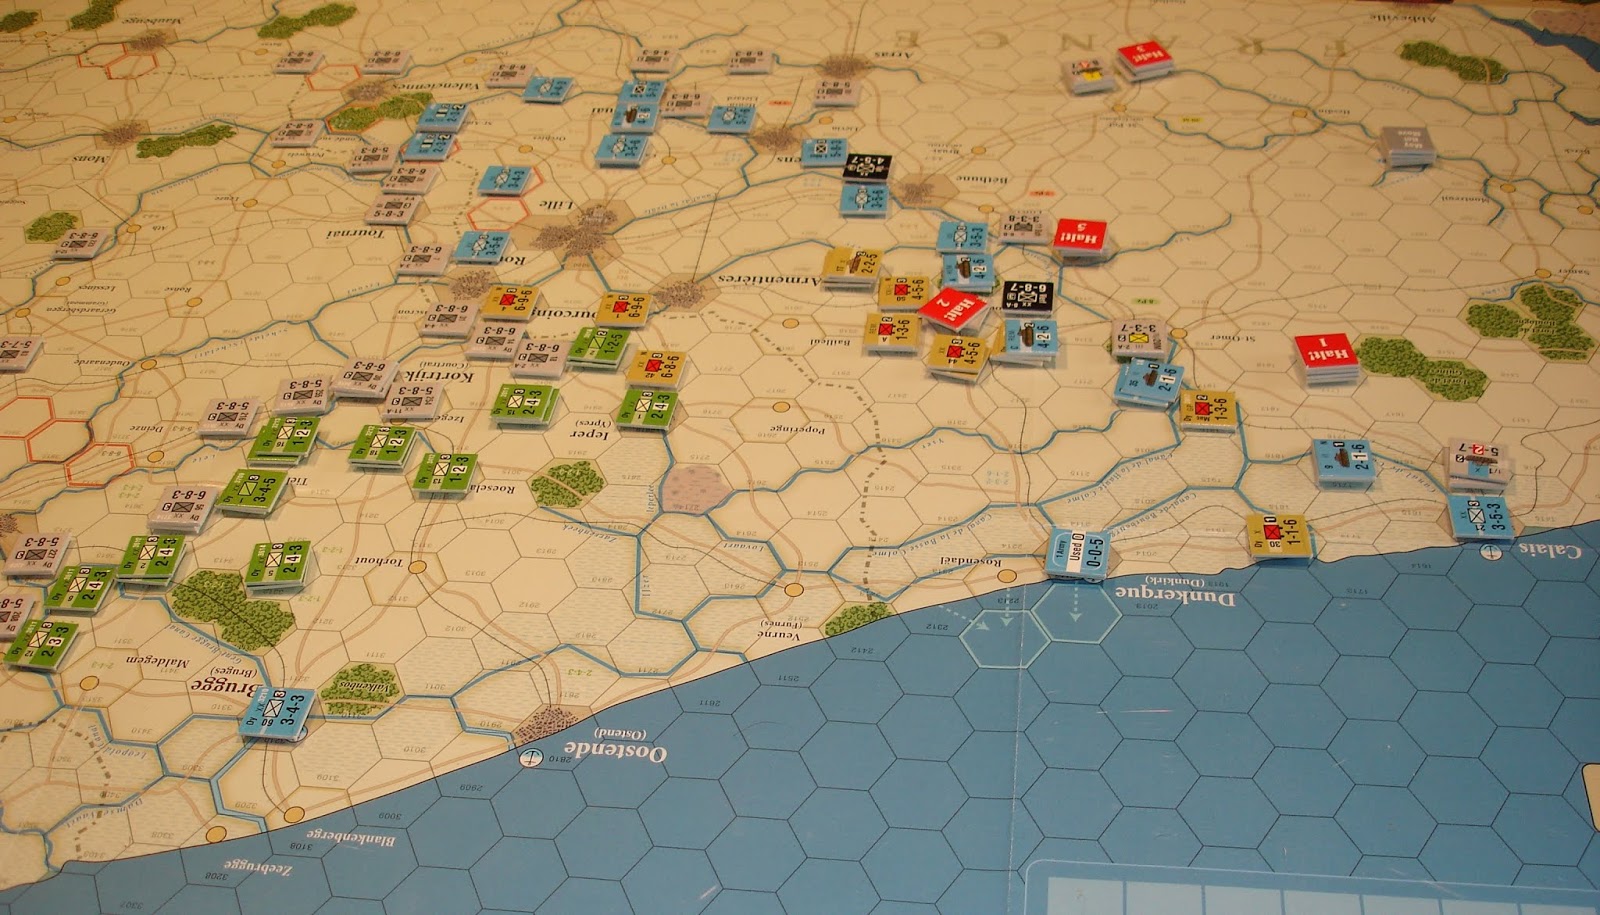
Yesterday Richard and I played the second scenario in the GMT France '40 game, Operation Dynamo aka Dunkirk.  I went the Allies.

 End of May 24.  Rommel has disobeyed the Hitler Order to HALT!

 Will he gets his comeuppance?
Not on those die rolls.  My attack, although at 4:1 was just a 2 which meant defender retreat.  Rommel threw a 6 to conduct a determined defence and stood his ground.

As Determined Defence was to feature significantly in this game, I have reproduced the table.  Needless to say, German armour is Elite.

 May 25.  The Belgians are holding firm (mostly).
Calais has been reinforced.  However the Allies are pulling back, preparing for the worst.

 May 26.  An SS Division has gone to Rommel's rescue.  How will he ever live that down?
I'm a bit worried that the pocket is more looking like a funnel.

The Hitler Halt is still working to the Allies advantage.  It works as follows: there are six chits which the Allies place and then roll two dice and remove the chit whose number comes up.  The Allies like throwing doubles (as in the above picture).

 May 27.  The Allies have pulled back further.  
The German armour is no longer subject to Halt orders.

 May 28.  Belgium has surrendered.
It's not all bad as soon the German armour will have to start to withdraw.
Speaking of withdrawal, the Allied evacuation has started.

 Knowing that they will be withdrawing the Germans launch lots of attacks with their armour.
Luckily the Allies successfully conduct some determined defences and avoid breakthroughs.

The issue of the German armour being withdrawn is explained in the Designer Notes.  The mechanic means the Allies are fearful of the German armour, but that it will be limited in its effectiveness.

 May 29.  So far the Allies have been able to evacuate six units.
However the German attacks risk cutting off troops from Dunkirk.

 May 30.
It is getting serious.  A number of Allied units are having a difficult time pulling back.
The few remaining Panzer Divisions are still causing problems.

 May 31.
The German armour is getting close to Dunkirk.

 June 1.
Phew!  All the German armour has now been withdrawn.  
The German infantry has been ground down.  Units have continued to be evacuated...

 June 2.
This was a disaster of a turn as the Allied left flank collapsed,
 positioning the Germans next to the evacuation beaches.

June 3.
However, by the next day, the Allies had been able to evacuate enough units to be able to claim Victory.

This was an excellent tense little WW2 game covering quite a different aspect of the war.  Air and naval power is all abstracted, and the mechanics are the classic move/combat sequence alternating between players with units rated for attack, defence and movement.  Elegant and very engaging.

Friday, July 13, 2018

France 40 - Take Two - Part Two

Today Richard and I finished the Sickle Cut scenario.  As the game is played at his place, he'd had a few hours to contemplate his next move.  The Germans broke through!  It was time for a desperate counterattack.

A point was found where the German thrust had created a narrow neck just right for cutting.  
De Gaulle was ready.

Success of sorts...De Gaulle is seriously exposed.

The situation at the end of May 21.
That is Rommel at the very top of the map, just a short distance from Abbeville on the coast which will cut the rail line and effectively give the Germans a victory.

On May 22 the fighting had continued to sever the neck, 
but it was ultimately unsuccessful.

Game over.

We thought about going into extended time, but a look at the Allied reinforcements showed that were going to appear mainly in the South East which was too far for them to get into action.  The Germans were making progress in the North and could move more troops to match the French in the centre.

Thursday, July 12, 2018

Vikings versus Andalusians

After the success of last week's game I decided to see if I could field a 28mm Basic Impetus army using my Saga Vikings.

And I could!  

It looks a bit like a DBA army (must check what the DBA Viking army elements are).

I had to make up special movement trays for my figures and need to redo most of the flocking (which you will see is pretty sparse if you expand the pictures).

Simon's Andalusians are arrayed in front of my army.  
He is short a unit of slingers and a unit of light cavalry. 

 End of Turn 2, from the Viking left as they start to advance.
Raiders are on the left (bottom of photo), Irish on the right.

 Turn 3 from the Viking right this time, 
where the Andalusian medium cavalry are rapidly advancing.

 Turn 4 as seen from the Andalusian side.

 The Christian Knights make a magnificent charge.

 End of Turn 5 and the knights finally stopped chewing up the Vikings before them,
Poor cohesion roles and an inability to inflict casualties 
had the two remaining Viking units down to 1 VBU each.

 There was a brief pause...

 End of Turn 6.
The Vikings have charged in the centre.
On the Viking right there is only the general's unit left facing the victorious knights.  

 End of Turn 7 and the knights are in check.
On the Viking left contact is about to be made, 
while fighting continues in the centre.

 End of Turn 8 and it is a standoff on the Viking right.

 While on their left the Vikings have routed all before them, except the Andalusian commander.

 End of Turn 9 and it is getting tricky for the Vikings.

 End of Turn 10.
The victorious Vikings on the left (on the right of the above photo)
 are now hurrying to rescue the right.

 End of Turn 11.
The fighting has been very ineffective.

 And with Turn 12 the fighting continues to be of no consequence.

 End of Turn 13, unlucky for some...

The Viking right could not hold out.  
The Viking commander goes down fighting.

The Vikings suffered badly with initial high cohesion roles that saw them take a lot of casualties.  They then made an amazing stand by rolling low for cohesion and eventually dying through accumulated disorder losses.  Unfortunately their left wing troops couldn't get back into action, which is fair enough given the Andalusians were missing two units.




Wednesday, July 11, 2018

France 40 - Take Two - Part One

Richard and I started a repeat of the GMT France 40 game.  I went French.  The Scenario is The Sickle Cut - Guderian's Drive to the Sea.

 May 13, tanks are heard rumbling in the woods.

May 14, the German attack is confirmed.
The river line has been breached in two places

 May 15, the Allies pull back, attempting to form a new line.

 May 16, Rommel looks like he has broken through.
British troops are being rushed to plug the gap.

 May 17, and the Hitler Halt is invoked.
Namur is abandoned.

 May 18, and the delay has allowed the Allies to close the gap.

 May 19, but the Germans keep pushing.
All their armoured divisions are now committed to creating a breakthrough.

 May 20, if only the Allies could mount a counterattack...

 At this stage it looks like we will be going into extended time.

The big picture.  This is a game of punch and block.