Saturday, April 9, 2016

Vimeiro - Take One - The Game

The game commences with the 7:30 turn and ends with the 12:00 turn - ten turns in total.  This timeframe was taken direct from the original Blue Book scenario.  Please see previous post for deployment and other aspects of the set up.

As it was a solo game and all the figures were mine with enough variety I was able to go without labels.  

End of the 7:30 turn and the French have arrived.  Brenner's out flanking force can be seen in the top right.  Maybe I had given them too much of a head start?

The Allied 7:30 turn and Wellesley reacts by moving troops from the western ridge. My first challenge was that the troops had to cross impassable terrain.  I ruled this was okay if they were in manoeuvre (column) and following a road.

By the end of the 8:00 turn the French have lead units within striking distance of the British deployed before Vimeiro village and Brenier has made good progress and is approaching Ventosa farm.  However Wellesley's reserve has reached his flank.  Both of this forces are out of command (basically only a 30% chance of  getting a half move).

Solignac's Brigade attacks Fane's brigade while the rest of Loison's division exchanges long range fire with Anstruher's.  The French are disordered by the long range fire and their attack meets with disaster suffering four losses and routing.

The British rifles (Fane) had considered pulling back to take benefit from their longer range, but failed their command roll (and as it was did take casualties from French fire).  Both British brigades are benefiting from being deployed even though the rough terrain doesn't provide cover..

The outflanking moves.  Wellesley has another two brigades almost in position to block the French.

9:00 and Loison is busy rallying his division after its repulse.

Brenier deploys (using my rule variation for march columns being in command in the turn they come out of march column).  The British and Portuguese also deploy.  
A good view of the total battle can be seen in this picture.

9:30 Kellerman attacks.  The British rout before it comes to close combat.  The French luck finally comes good and this counts with four units firing on the British.

By the end of the 9:30 turn the French are in a good position against the village of Vimeiro, seen here occupied by Acland's brigade.  The Rifles have rallied (love that rule in the new edition of the rules for self rallying, however I play it without penalty).

However Brenier's attack has become disjointed.  His cavalry can't engage because of the rough terrain and he's facing enemy on two sides.

10:00 and Loison and Kellerman both launch attacks.  Loison routs Anstruther but is disordered as he follows up into rough terrain.  Kellerman forces Ferguson to retire.

Brenier's lead unit comes under heavy fire.

Top down view of Loison's and Kellerman's attacks.  They were lucky, but only needed moderate luck as both of the British units were disordered.

The view from the French side at the end of 10:00.  Brenier's lead unit has routed.  This is somewhat of a blessing as this allowed it to rejoin the main body of French.

The end of the 10:00 turn from the British side.

10:30 and the French have pulled back to reposition for their next attack at Vimeiro village.  Brenier has also started to pullback.  The British maintain a steady long range fire which continues to inflict casualties.

11:00 and Kellerman launches an attack on the village.  The Grenadiers suffer losses on the way in and in the first round of combat, but in the second round they succeed in disordering Acland so that his brigade is forced to withdraw and suffers more losses causing it to disperse.  Things get worse for Wellesley as Fane's brigade is also dispersed (from long range fire).

Hill and Anstruther counterattack driving Kellerman from the village.  Hill was repulsed, but Anstruther was able to occupy the village (as Kellerman had to withdraw because he was disordered do to previously occupying the village after combat).

End of the 11:00 turn.  The forces are starting to thin down.  Wellesley might have sent too many troops after Brenier as he now finds his front around Vimeiro is weak compared to what the French can now muster against it.  .  

11:30 and Charlot's brigade of Loison's Division attacks Hill who is forced to withdraw taking heavy casualties (which reminds me why I previously didn't like the withdraw rule, however I find it works well now that I understand it).

The end of the 11:30 turn.  The British still hold Vimeiro.  It is turning into a very hot day.  Do the French have the ability to make a final attack?

Yes.

The end of the 12:00 turn and end of the game.  Casualties have been very heavy with a number of units dispersing due to long range fire alone (maybe the French did have their artillery with them after all)

Junot makes his way to the tavern in Vimeiro for a well deserved drink.  Wellesley has his work cut out for him to retreat to Porto Novo to hand over his command to Burrard and board ship back to Ireland or India never to return to the Peninsula which, with Burrard's subsequent surrender to Junot leads to a whole different outcome to the Peninsula War.

I was amazed at the outcome as I thought the French  were doomed.  This was a very exciting game with plenty of see-saw action.  Cavalry and artillery is best left out and the whole of the terrain could just about be considered rough.  Command control of any flank marches is critical, in fact, I would say, if a flank march or reaction to one will put troops out of command, don't    You can get away with it with corps, but divisions or smaller sized forces are a challenge although possibly cavalry can get away with it,.


Vimeiro - Take One - Preliminaries

It has long been my dream to do this battle with Napoleon's Battles.  The scenario first appeared in the Blue Book, but I created an OOB using the Osprey book and a map which I took from Vassal of MMP's Vimeiro and Talavera boardgame.


The map is a good match for this from
 http://www.napoleon-series.org/images/military/maps/peninsula/vimeiro.jpg


The hex grid has been kept as I also want to use the map for some hex based air games.  As it turned out the terrain, even at 2 inches to the hex or 200 yards in Napoleon's Battles game scale, is far too detailed.  It is possible that a battle the size of Vimeiro is not ideal for a game system like Napoleon's Battles and this was one of the things I wanted to test out.

Terrain Effects

Creeks are impassable to both cavalry and artillery except if they are in march column and moving via a road crossing.  My reasoning is that while they may or may not have much water in them they have steep banks covered in boulders and thorny bushes.

Creeks count as rough terrain for infantry while any part of the unit is in such terrain.  The infantry unit also counts as fording

Any hex that has rock, orchard or vineyard etc symbols is considered rough terrain as does any hex that has three or more different contours.

Rough terrain disorders artillery and  cavalry.  Infantry in line moving in rough terrain or changing formation in rough terrain is disordered (this does not apply to BrLT which is classified as skirmish infantry).  Remember if you are disordered you can not move to close combat.  My reasoning here, again is that there is a lot of rock and scrub.   

Impassable terrain includes any hex with the large stone cluster symbol which also tend to have multiple contour lines.  These are very steep with dense scrub and boulders etc.

Infantry in column or march column can move along a road through impassable terrain.  Artillery and cavalry can only do so if in march column.

Villages are just +1 as they are small and unprepared.  They provide cover.

Most other terrain doesn't provide cover as it is not large enough to hold a unit.  I realise some of the villages have that problem as well and so might need to add some terrain pieces to better delineate the village area.

Allied Deployment

For the Allied deployment I used the Blue Book scenario (mostly), but kept the Cauford's brigade in reserve with the Portuguese.

The Allied deployment which is basically on the western ridge from which direction the French have been seen approaching.  Two brigades are covering the village of Vimeiro.  Even though the terrain is rough going and would disorder troops in line (or in "deployed posture" as I like to think of it) I have assumed they have had time to recover their order.  The bulk of the troops are in column (or "manoeuvre posture") while two brigades are in march column as a reserve as Wellesley has been informed that some French troops are attempting a flank march.

Allied Order of Battle

Wellesley
Cavalry                         8BrLC
Royal Artillery
1st Brigade Hill                 20BrLN
2nd Brigade Ferguson         20BrLN
3rd Brigade Nightingall 12BrLN
4th Brigade Bowes         16BrLN
5th Brigade Craufurd         16BrLN
6th Brigade Fane                 16BrLT
7th Brigade Anstruther 20BrLN
8th Brigade Acland         12BrLN
Portuguese Trant         16PtLN

Allocating some cavalry is probably the most controversial thing in this OOB

Having Wellesley with a response number could reflect him being distracted by the imminent arrival of Burrard or Dalrymple.  I didn't use the Wellington special ability (were he can be on react and be moved to join combats to lend his defence bonus - that would certainly help the allies, but I think they are already ahead on points - although that is something I need to check)

French Deployment

Again this came from the Blue Book Scenario.  The positioning of the outflank force was a bit of guess work and they possibly should have been kept back with the main body to start with.  However that would have given the French too much temptation not to split their force as Junot has been criticised for doing.

Loison's division on the left with the Thomiere's brigade of Delaborde's division on the right followed by Kellerman with the Grenadier reserve and the remainder of the cavalry.

Brenier's outflanking force including one of the provisional cavalry regiments.

French Order of Battle

French
Junot
Cavalry Division Margaron
3rd Provisional Dragoons 8FrLC
4th Provisional Dragoons 8FrLC
5th Provisional Dragoons 8FrLC
Artillery
Fr4#
Fr4#
Fr4#
Fr4#
Infantry Division Delaborde
1st Brigade Brenier                16FrLT
                70th Ligne        20FrLN
2nd Brigade Thomiere                16FrLN
Infantry Division Loison
1st Brigade Solignac                20FrLT
                58th Ligne        12FrLN
2nd Brigade Charlot                16FrLN
Reserve Kellerman
                                       16FrGN

As it turned out I didn't allocate any artillery to the French.  This was probably something of a blessing as it would have been hard to keep in command and terrain would have created movement problems as well as targeting challenges.  It might have also caused the French to spend time trying to maximise their artillery advantage and run out of time to make the actual attack.

As per Wellesley's challenge with the arrival of senior officers, Junot was challenged by the bottle and perhaps having the French roll for command could be a way to reflect that.  Without the command bonus he would be a 7 (i.e. 70% chance of keeping his army in full command each turn, assuming units and his divisional generals are in his 9" command range.  For comparison Wellesley would be an 8 and has a 10" command range).

Optional Rules and Rule Variations

 I use Napoleon's Battles 4th Edition with some throwbacks to 2nd Edition (principally I retain the 2nd Edition's way of doing interpenetration).

 Turn to flank is a formation change within the unit's footprint with line going to column formation.  A unit can always try and wheel to the right or left and then move sideways if it can to achieve the same thing (which would mostly work for units in column).  Some units can also effectively perform two or more formation changes in a turn.

A unit halved for disorder or with a half move does have its movement affected by terrain.  (But, remember a unit moving sideways or backwards in rough terrain uses the worst effect, not a combination).

If a unit that is able to move, doesn't have enough movement to change formation it may use all its available movement to change formation, but is then disordered (my reasoning being that the order can still be given, it will just take a while before it is completed).

A unit in march column on a road is in command and may change formation (I'm in two minds about this.  I did use the unit being able to roll its response number to be in command which could be used to achieve the same effect. Alternatively you could think of the original command being to go to such and such a place and change.  However my preference is now just to force the unit to use its initiative to come out of march column, although this can be rather deadly.  Still in two minds.)

Unit coming out of march column can pick any of its bases to form up around and also angle that base in any desired facing.  This is more from my experience with the Prussians in the Waterloo game and also from playing Fire and Fury.

A unit that forms or is in march column with its head on a road gets to be considered to be on that road provided the head stays on the road (still thinking about this).

A unit that wins a combat against an enemy in a village gets to advance fully into the village (i.e. occupy it).  It is disordered.  It then needs a turn to recover its order and the following turn, subject to command, can deploy into the village.  Occupying a village in this way puts a unit into column formation.

A unit in line formation (i.e "deployed posture") gets a plus one firing at enemy in column.  This does not include units deployed in a village who continue to suffer the existing minus one reflecting their strength is dispersed around the village which of course is providing the ability to fire from all sides.

Units in column firing at enemy in line get a minus one.  Again this does not apply to firing at enemy in a village who get to count as in cover (assuming they have moved to fit within the village's foot print.  A unit deployed in a village - I should be using the term Built Up Area - gets the additional benefit of +1 to its disorder and requiring a double to score one hit as per 4th Edition).

Enemy contacted but then routed or dispersed in the fire combat phase does not cause a winner's loss but do allow occupation.

Using small units does create a problem depicting formation.  I'm yet to work out a solution.


Thursday, April 7, 2016

Goblins and Friend

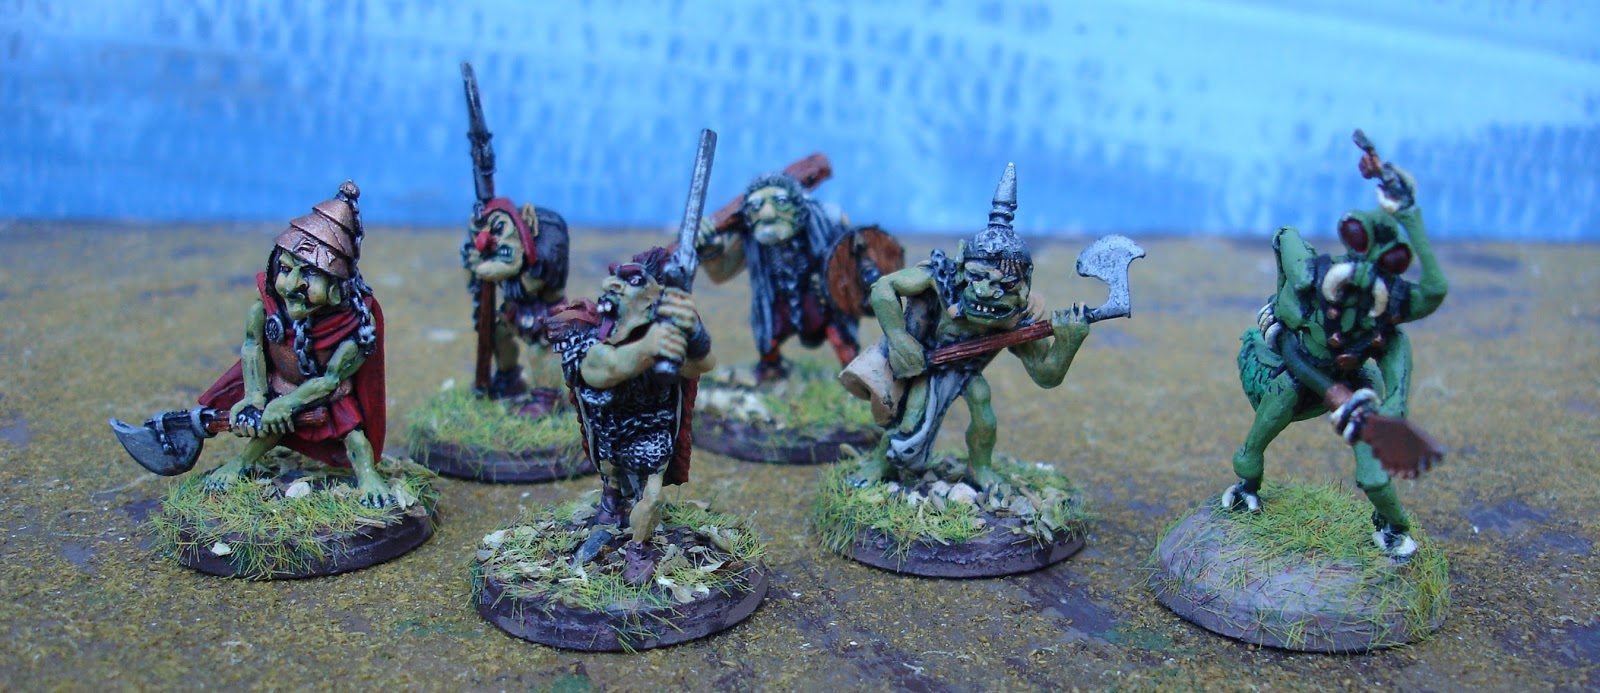
Some people have fairies at the bottom of their gardens, we have goblins.

Goblins (or goblin like creatures - I've had these so long I cannot remember where I got them, Possibly at a CanCon second hand stall.  But I'm guessing.)

Their friend (in the same unknown parentage category)

Sledge


Tufox


Axmagurgle


Wich


Sinu


And friend.  

This figure was purchased as a possible Green Martian for my slow burning Barsoom project.  When it came to it, I didn't have the heart to remove its abdomen.

So now I have a group for Songs of Blades and Heroes.

Better still I've finally finished painting these figures.

I tried a different basing style going for a swamp or forest feel.  

The first scatter was oregano but I found the base needed lifting with the brighter green of the static grass

Happy now, although the grasshopper could have done with some more grass.  Maybe he ate it?


Wednesday, April 6, 2016

Old Glory Prussian Landwher

Finished these in record time, however they were meant for last year's Waterloo game.  I'd ended up borrowing troops from my late friend Myron Shipp which took the pressure off.  When I was tidying up my paint desk, or rather trying to tidy it up, I found these figures and with a reference from  centjours.mont-saint-jean.com I thought "easy".  I was mostly right.  Took three goes to get the shade of blue right.  It's a base of Jo Sonja's Prussian Blue Hue with VJ Prussian Blue mixed with the Prussian Blue Hue for the highlight.  In between there was a coat of VJ Dark Prussian Blue but it just didn't look any good.  Pants are JS Nimrod Grey with a highlight of JS Titanium White.

Twenty four figures, here deployed as two 12PrLW for Napoleon's Battles.  

Good pose and mix of foot wear.

Flags are from "the Internet".