Showing posts with label Terrain. Show all posts

Monday, July 1, 2024

ACW Rail Fences by Leadbear's Tufts

I have a plan to make fences, or rather more fences, for my ACW collection, particularly those distinctive to the period.  However, it is a project that is yet to get underway apart from collecting materials.  It might have happened had my partner not taken long service leave and decided to redecorate my studio.  It needed doing so can't argue, not that I would dream of arguing with her, but it did mean that the chances of progressing that project were close to the chance of Rish! getting reelected, Trump telling the truth and Australia having seven operational nuclear power plants by 2035.

Leadbear to the rescue. I think I might have mentioned previously that some of the floral tufts I have used, particularly with my Byzantines, are from Leadbear's Tufts.  In a bit of serendipity, I saw a post from Leadbear on Facebook offering some ACW rail fences for sale.  As it was my birthday, I thought they would make a wonderful present for ma belle-mère (excuse my French) to give me.  And so, it came to pass...

Rail fences pictured with some of my figures - perfect for 15mm.

The complete package.
Very happy!

Here is a link to Leadbear's FB page: https://www.facebook.com/leadbearstufts/

Sunday, August 27, 2023

Dragon Molars

These are Dragon's Teeth for the Stolberg Corridor scenario/mini campaign game I am developing for Rommel.  When I did my original research I was sure I saw some square Dragon's Teeth and having found some little cubes suitable for the 15mm scale I thought way to go.  Now I can't find the refence and see only pointy Dragon's Teeth.  It is possible the Swiss used square blocks, but I am at the stage of whatever.  


The cubes were secured to plastic bases (cut from old CD cases) using PVA glue and then covered with plaster.  Black paint, grey paint and a dry brush of some more grey paint (that doesn't seem to show) and then a brown base and a dump of static grass and I reckon they will do nicely.

Interestingly they show no adverse affects from having been varnished, in sharp contrast with the test strip I did at the same time (and will keep for a separate post).


Saturday, January 21, 2023

Ancient Paper Buildings Almost Ruined

A project I am working on regarding a campaign for Basic Impetus requires a town (which represents Difficult Terrain and functions identical to a Wood as far as I can tell).  But I didn't have any suitable buildings.  I decided to go for immediacy and cheapness especially after I found two suitable buildings on https://papermau.blogspot.com/ 

One was well within my skill set, the temple was a bit more challenging (I ended up reinforcing or rather adding as formers, match sticks to the steps).  Lots of fun and perfect for the job.  But what if they get wet?  I have a special fixative, but on reading the label and finding it was gloss I decided just to use my regular matt varnish.

Now, my colour printing was already a bit subtle to begin with, but the varnish has or could have if I wasn't such a light touch, faded things even more.  Ruined!  Well, not quiet, just baked under the unrelenting rays of the Mediterranean sun.


Given the homemade low quality nature of most of my terrain these will do nicely.  Of course, having made these two building I find a much more imposing Ancient Greek building on that site, but I think my skills have been tested enough for now.

A town only appears in Basic Impetus on a roll of a double six and even then there are options, so hopefully two buildings will be enough.

Final comment.  I was thinking/planning to make bases for them, but now think this is not necessary.  They are both weighted with wooden internal bases to stop them blowing away due to a slight breeze or a sneeze.

Saturday, September 26, 2020

A few Germans and a bit of terrain

It's not all games, sometimes I get to finish modelling projects as well. 


I've made more river segments than just this one, 
but it has been matt varnished 
and consequentially the limited water effect I had managed has become extremely limited.
Easy to fix.

Bits of balsa and popsticks and toothpicks,
sand and PVA glue and a good lick of paint.

Look over there! 
The grass is greener!

Always loved these 75mm guns.
I've put them on big bases
as they represent artillery assets for use with Rommel
and because I have spare large bases.


Tuesday, October 8, 2019

Hexes A Go Go

One of the major challenges being a blogger is thinking up amusing titles for posts.

I've always wanted a hex mat and now I have one.  However I can't decide what to do with it, so I've tried it out with a range of my figures and models to see what looks good.  Here are the results:

6mm base that I kind of did for Blucher.
Perfect fit!
Information on Blucher Hexes can be found here:

I should note that I have only five bases of 6mm figures, although lots of 6mm figures in varying degrees of painting and basing.

I wonder how my Impetus bases fit?
Perfect!
The Light Cavalry base is the biggest, so all the rest would fit fine.
Maybe some large units might have an issue...
Just need to convert Impetus to hexes to give it a try.

One of the initial reasons for getting the Hex Mat was to see how it would work for Napoleonics.
This standard cavalry unit from Napoleon's Battles is a tight fit.

But a two base cavalry unit is a much better fit.
The hexes are roughly four inches wide.

A big Napoleon's Battles infantry unit.

Again, a slightly smaller unit fits better 
and allows for different formations or postures to be depicted.

Column of Manoeuvre

March Column

There's even room for artillery.

Not quite limbered artillery...

But where there is a will, there's a way!

Do I have enough hexes for a system like Bag the Hun?

Sadly my hopes for using this mat for Rommel ain't going to work.
So I'm making plans to add hexes to the reverse side of my squared desert mat.

Thursday, August 29, 2019

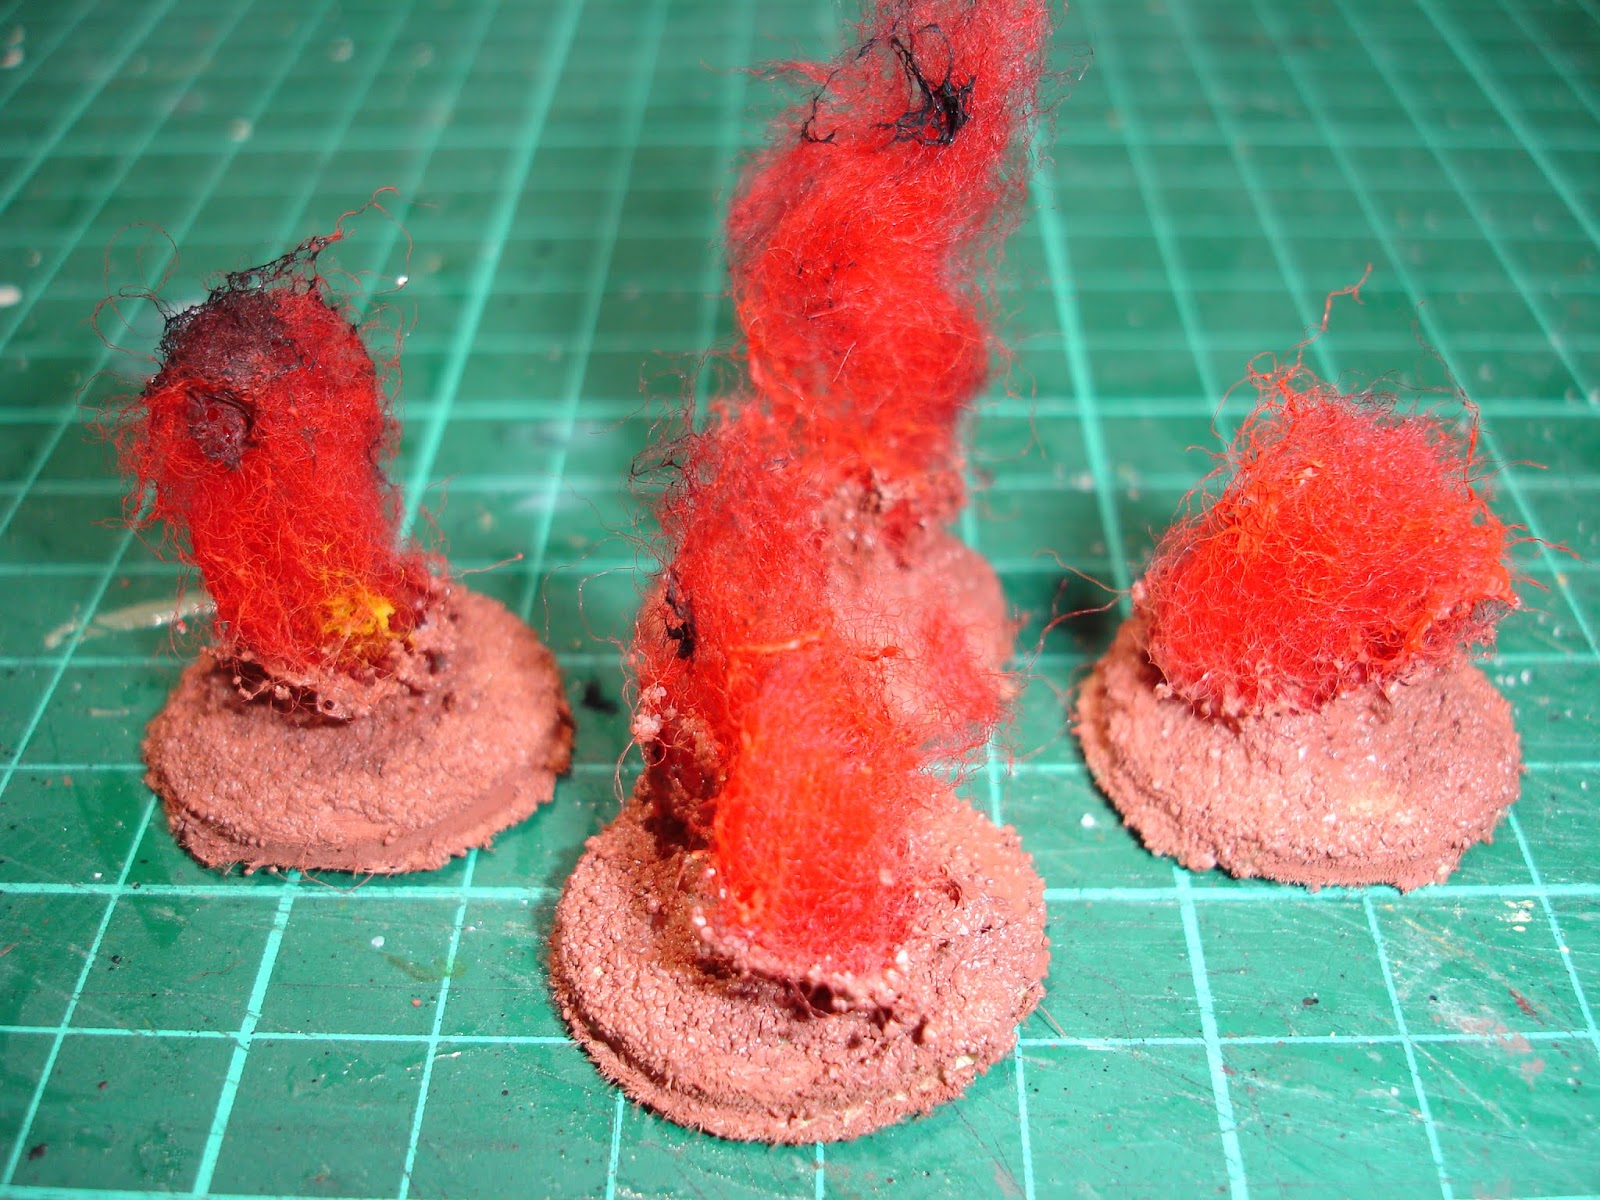
Boom

 One of the more useful terrain pieces or markers that I have made.
Currently they are doing sterling service representing tipped units in Rommel.

A friend asked me to send them a picture of one and it inspired me to do this post on how I made them and in the process make a few more.  In my last Rommel game I kept missing the combats and so figured a nice red explosion would serve well to mark them.

The fluffy stuff is for cushion or teddy bear stuffing.
The MDF disks are the "holes" that resulted when I made the movement trays for my Mahdists.

 The knife was used to trim the MDF base 
and the stick then used to poke the wool through the centre hole.
The missing ingredients, apart from paint, are PVA glue and sand.

PVA glue applied.  
The resultant dried base can be pressed down to give a flatter bottom.  
I haven't found it necessary to file or sandpare them,
 just a firm rubbing on a flat surface does the trick.

Ready for the messy step...

The wonders of PVA glue and sand.
It is possible to get a bit of sculpting in with this mixture,
by drawing the PVA glue up the sides of the wool before sprinkling sand.

Base coat and adding a bit of character to the flames.

Finito!

Wednesday, May 22, 2019

Don't fence me in

A lucky find at my excellent local wargaming supply shop, Tactics, 1.5m of fencing for 15mm scale.

 The various finished components fit together very flexibly as can be seen in the above image. 

I was in the process of planning to make such terrain pieces and had done a few some years back, but it is a slow fiddly processing in this scale.  This product from 4Ground is just fantastic.  Came away from the sprue with ease and went together perfectly.  I probably did go overboard with bassing (mainly filing down the edges - super easy with a sharp knife, then a bit of texture paint, more paint and then flock).  They have come up a treat!

These are the four components.

Perhaps the finished wood is too dark, but then I am used to Australian conditions, where wooden fences would quickly go to a light grey with the sun's bleaching. Wet wood would be dark and if it has been treated with anything like creosote it would also go dark.  I did consider going over with a light grey/brown dry brush to lighten them, but I felt I'd put enough effort into them already.

And I saw they also do snake rail fencing!  I've ordered two packets.  A must for my ACW army.

Tuesday, March 20, 2018

Thirty Mahdists

Another project finished.  The figures have been in my possession since December 2014 when I received them as part of the post NWS Kris Kringle shuffle.

I started work on them in December last year, The Mahdists are Coming, so it has taken me just under three months to complete them.

Flags came from http://www.warflag.com/flags/colonial/dervish.shtml

 A bit of over exposure.

Now corrected, but I liked the previous bright glare of the hot Sudan sun, 
so kept that photo in the mix.

 When I say complete...  Well, this base...

 Is different to this one.  In the previous base the figures are resting on an extra washer that gives then just that bit of extra height so their base sits better with the movement tray.

 For what is a simple uniform, the flesh tones took me the most time, then I put in some double work on the white tunics.  But the coloured patches were easy.  
It helped that I was working on other projects while doing these.

The flags, as noted, were images sourced from the Internet and printed, folded, crushed and glued.
Also, note on this figure that I have him sitting on a second washer which would be the next task if I decide to raise them all so they sit flusher with the sabot.

 It took me a few brain cycles to finally settle on how I was going to base the figures.  I am very happy with what I came up with as it was relatively easy to do, versatile and provides other opportunities. 


I had these 25mm slotted magnetic bases I was going to use and I figured doing a sabot that would then be affixed to a metal base was the way to go.  This failed as the base size for Sands of the Sudan would have only accommodated four figures (as it is the recommended basing is 7 to 10), but worse my 25mm bit meant it was all too tight to reliable drill out four holes (as can be seen above).  Plus the 25mm bases would have been a snug fit.  I then switched to 20mm plastic bases and a 20mm bit but that would also have been a tight fit as well and still left me with the magnetisation to do.  But then I found the miracle ingredient:


These washers were perfect, coming in at 18mm made for a decent fit.  I glued the drilled out MDF base to a backing of magnetic paper (actually one of those fridge magnets that are now prevalent in mailbox drop advertising material).  I painted the MDF first which made life easy.

Terrain


 And here we have the thirty Mahdists swarming over my latest bits of desert terrain.

 I wanted ridges and cliffs.

 But more importantly I just need a bit more to supplement my previous production.


Saturday, February 17, 2018

Something about a tree

I could get all deep and meaningful and say that if a tree falls in a forest does anyone notice, but nah...

This is a club tree that was used in my last game now restored to its former glory.


Beautiful trunk


The tree had broken from its original trunk and so I decided to make it a new one using a black straw, PVA glue and sand plus lots of paint.  The fit was perfect and I decided to dull down the base a bit as it was very bright.


This post is actually because I have three big painting projects underway that just don't seem to be getting close to finishing and I had a need for at least closure on something.  The three projects are:

  • a heap of stuff I am doing for my 15mm Western Desert Force (stuck with having used Desert Yellow when I should have used Dark Sand and whether to use transfer or hand paint insignia or just leave them out);
  • thirty 28mm Madists (stuck with a range of basing options); and 
  • 24 Napoleonic Middle Guard in 15mm (when I would rather be painting Russian Dragoons).