Showing posts with label Blucher. Show all posts

Sunday, October 13, 2019

Napoleon's Battles via Scharnhorst

I had not got my act together for the Club's Games Day and just thought I would go with NB Scenario One yet again, but then I had a thought, let's front end it with Scharnhorst.  I'd done this successfully before a few years back, but had not got around to trying it again.

I had a quick few tests and went with just three movement points representing an hour (which is two on table turns).  That seemed to work.

Stephen went Prussian and Simon French while I umpired, adjudicated, pontificated and made things up as I went a long, with occasional consultation.

 There were three hours of marching about until the French declared battle.
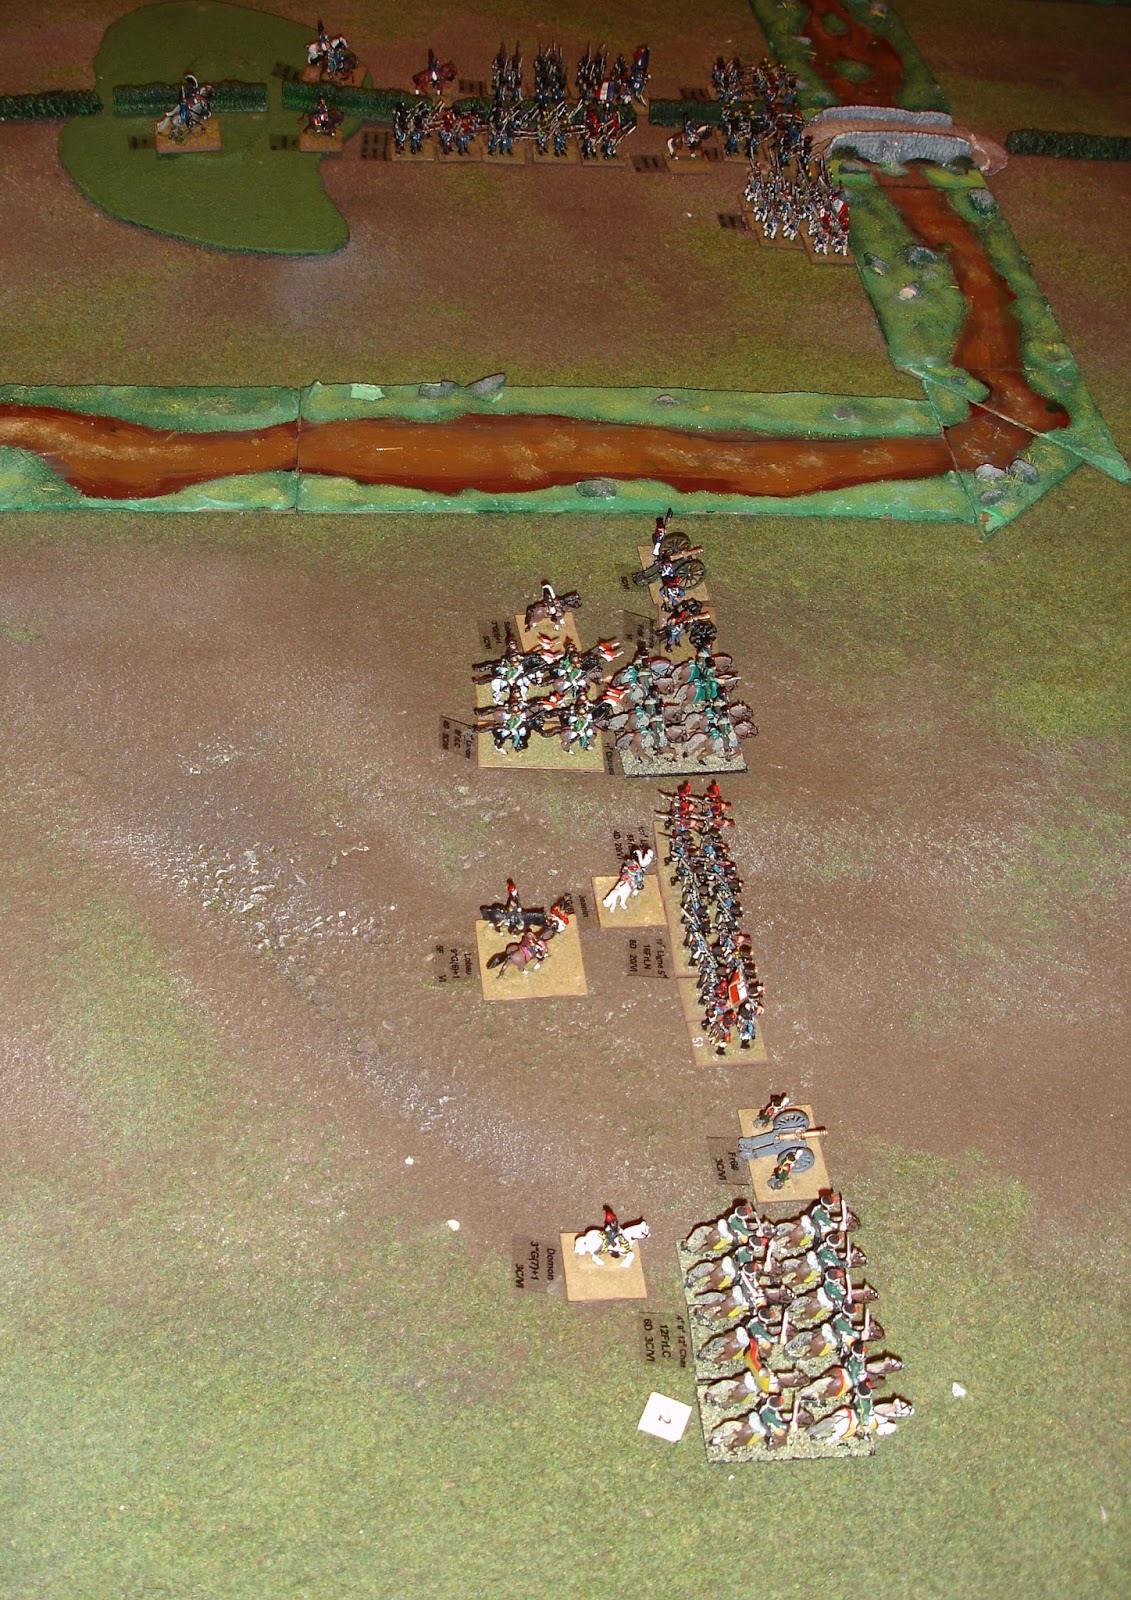
The table was C4, C5 to E4 and E5.
As can be seen it had two nasty rivers running through the battlefield.  
Fordable, but rough.

 Facing west.
The Prussian Advance Guard which was in E5 is moving to join the Prussian 1st Division 
that has just arrived.  
Their 2nd Division is marching to the battlefield
and will arrive in about four turns.

 The Prussians suffered badly at start.

 But when their reinforcements arrived...

They were able to fight to a standstill.
The French centre was weak and the two flanks separated
making further combat problematic.

The Order of Battle was as per Scenario One which is set in the Revolutionary War.  Using Scharnhorst made for a much more interesting game and holds lots of promise.

Here are a few extra photos that Stephen took:


Sunday, August 21, 2016

Brunswickers for Blucher

After lots of angst I took the plunge and (I know it's cheating) "painted" up some 6mm Heroics and Ros figures for the three Brunswick brigades that took part in the Waterloo campaign.

The angst was not in the painting but in the basing and positioning (unit representation) of figures as well as deciding to go with a three by two inch base.  One of the reasons for that size base is that it works in well with the Napoleon's Battles rules.

The basing compound is plaster and then over painted with a few different shades of green.  I ended up going lighter and brighter as I think the 6mm figures need it.

As for representation, 12 infantry equal a battalion and 3 cavalry a squadron and one gun a battery.

I think 6mm look good from a distance.

One squadron of Uhlans and four of Hussars.

The man himself.  
It will do as the divisional commander for Napoleon's Battles as well as the Hero base for Blucher.
 (I'm not sure how heroes work in Blucher, but easily doing the stand is the beauty of 6mm).

Buttlar's Brigade incorporating Lieb Battalion, 1st, 2nd and 3rd Light and Heinemann's Horse Artillery battery

Specht's brigade incorporating the Avantgarde, 1st, 2nd and 3rd Line and Moll's Foot Artillery.
I had fun doing the flags and collars which is the only distinction at this scale.

The view from the rear.

The 6mm bases shown with the Blucher unit cards.

If these bases ever get used I will probably either make up a roster or attach a label.

Visually it should be obvious that the infantry brigades have attached artillery (and maybe I shouldn't have done so many skirmishers) and that the cavalry is under strength as per the Blucher rules.

I'm thinking of doing future French and British units on one inch square bases to provide flexibility for Napoleon's Battle rules and also to allow for different configurations for Blucher.  It is also possible I might do a bit more diorama work on the bases, but time will tell.  As it is I'm surprisingly happy with these.

Minor Update 3 April 2017

The base sizes are 3 inches by 2 inches.

Tuesday, August 11, 2015

A little bit of progress on my 6mm project

Well, I've just about settled on 30x30mm and multiples of tha as the basing size.  This will work for Blucher and Napoleon's Battles (more or less).  60x30 also seems to be a standard in the 6mm world based on my research.

Also want the thin look to the bases, possibly with just painted texture and minimal or no flock.  I'm yet to try basing techniques.  With the guys I've just done, if I was to cover the individual figure bases the result would be a substantial (a mm) and if I was using 1mm plasticard and then magnetic paper it would be over 2mm by the time I'd finished.

My first attempt at painting 6mm Napoleonics in 25 years.  They were already undercoated white and grouped as four figure on little bases. I should have washed them as my black undercoated had a few problems taking.

The basing is just temporary, with the little strips held on by blu-tack.  I'm happy how the figures look from the distance, but they do need a flag.  This base could have an officer along side or other single figure, and of course bigger bases allow even more innovation/styling.

In my 6mm bonanza are a good number of painted figures and I've assembled these to see how they look (just placed on the base, not even blu-tacked). 60x30mm base.

Flags help immeasurably.  All I've done to these figures is over paint the base in a matching green (which is Tamiya Olive Green - the older, brighter green can be seen peaking out in places).

Sunday, July 26, 2015

6mm Basing Dilemma

Challenges!

How to come up with a basing regime that will work for Napoleon's Battles, Blucher and Baccus?

These are some 6mm figures placed on the 15mm Napoleon's Battles bases (3/4" by 1" for infantry, 1" by 2" for cavalry and 1 1/2" by 1" for artillery).  This is what I've done in the past (or rather did in the beginning before switching to 15mm figures).

The fit with the Baccus 60mm by 30mm basing seems reasonable.

The cavalry just would need to be on 1" squares - something I would probably do for my 15mm figures anyway if I had a free hand.

Putting such bases on a bigger 3" by 2" base for Blucher provides plenty of options to depict unit capabilities.  This would mean mounting the smaller bases on magnetic sheet and using metal big bases - something I'm set up to do for my 15mm figures.

Then I thought, why not go for 20mm by 30mm or just call an inch 30mm...

At least I am not tackling this challenge alone.  Mark B is also looking at how to base his 6mm Austrian army.  Here are some of his pictures lining them up on a 3" by 2" base.


I would much rather go with a single large base to avoid fiddliness, but I also like the flexibility...

A single large base allows for interesting dioramas...

This is a good post on the subject as well:

Do I really need to base my 6mm army for Napoleon's Battles?

Tuesday, July 21, 2015

What is the collective noun for 6mm figures?

I don't know, but this is what it looks like:

A  mess of guns and some cavalry.

Sorted out some of the infantry on this tray.

More troops - mix of French, British, Austrians, Spanish, Portuguese and ?.

I like these guys - British rifles by Irregular (my guess). 

More troops.

And still more.

But wait, there is more.

Even sprayed out they are two layers here and each layer is of multiple bags.

James of the ANF was the source of this bonanza and at least some of these belonged to his dad and Tony (I won't say any more on their source as I don'y know the details - perhaps James might contribute via the comments).

I have a soft spot for Heroics and Ros having used them to build a 6mm army in the early 1990s.

What to do with them?  With my first army I based them for Napoleon's Battles using 15mm basing, but my current thinking is to go for big bases for Blucher.  At 3.5 inches wide and 2.5 inches deep a big base provides an opportunity to host a good number of 6mm figures in an attempt to represent the brigade formation used in Blucher (at least I hope it does).

So, here are some potential configurations: 


I'm currently reviewing blogs and forums and anything else I can find to get ideas.  There is a lot of inspiring and informative stuff out there.

One of my first decisions will be do I build for a specific Order of Battle (the 100 Days being an obvious one) or do I go generic (and if I go generic do I need to be flexible or do I have enough just to create bases in a good variety of configurations).

Whatever I do I want to avoid anything that is fiddly, mounting troops on plinth like bases and overpowering the resultant bases with labels.

Thursday, July 2, 2015

Scharnhorst meets Napoleon's Battles

One of my reasons for getting the Blucher rules was the promise of the Scharnhorst mini-campaign system to set up a battle.  Last night I got to try it out.

My figures are currently still labelled for Waterloo so I constructed the following scenario:

Waterloo didn't happen

After the battle of Ligny, Wellington has retreated to the coast.
Napoleon and the I Corps, III and IV Cavalry Corps and the Imperial Guard are in pursuit.
Ney, with 27,000 men of the II and VI Corps is stalking Blucher in Flanders.
While von Bulow with most of the IV and III Corps watching Grouchy.
Blucher is left with 25,000 men to match Ney and seize victory from the jaws of defeat.


Next I had to translate or interface Scharnhorst to Napoleon's Battles.  This was only really an issue with reinforcements.  It was also necessary to keep a tight leash on my creativity as I could see lots of embellishments and additions to make to the mini campaign.

Reconnaissance I kept as per the rules.  I really like this concept, but want to do more with it.

A 200 point in Blucher translates to about 400 points in Napoleon's Battles.  The actual Blucher points match Napoleon's Battles points fairly closely, although force structures are quiet different with Napoleon's Battles having far more commanders and variable sized units as well as paying points for artillery. 400 points in Napoleon's Battles provides a force of some 25,000 men, enough to make two Corps comprising 17 units in total (infantry, cavalry and artillery, but not counting commanders). Such a structure can easily be formed into four columns, with no more than eight units per column.

Here are the Order of Battles I used


Points
Army of the Lower Rhine Blucher/Gneisenau 20"E(10)+3 [ 17M ] 92
Blucher 0"E(10)+3 0
Gneisenau 20"G(10)+2D 0
I Army Corps I von Ziethen 9"G(6)+1 [2F] 28
First Brigade 1/I von Steinmetz 4"A(7)+0 13
1B/1/I 12PrLN [ 6D ] 10
2B/1/I 12PrLN [ 6D ] 10
0
1/I Pr6# 11
Corps Cavalry C/I von Roeder 4"G(6)+2 15
1B/C/I 16PrLC [ 8D ] 15
C/I Pr6# 11
II Army Corps II von Pirch I 9"G(6)+1 [ 4F] 28
Fifth Brigade 5/II von Teppelskirch 3"A(4)+1 9
1B/5/II 16PrLN [ 8D ] 13
2B/5/II 16PrLN [ 8D ] 13
3B/5/II 12PrLW [ 7D ] 8
Sixth Brigade 6/II von Krafft 4"G(6)+1D 12
1B/6/II 12PrLN [ 6D ] 10
2B/6/II 12PrLN [ 6D ] 10
3B/6/II 12PrLW [ 7D ] 8
Seventh Brigade 7/II von Brause 4"A(5)+0 9
1B/7/II 16PrLW [ 10D ] 11
Corps Cavalry C/II von Sohr 3"A(5)+0 8
1B/C/II 12PrLC [ 6D ] 11
Corps Artillery C/II Pr6# 11
Fifteenth Brigade 15/IV Losthin 3"G(6)+1 [2F] 13
1B/15/IV 20PrLN   [ 10D ] 16
2B/15/IV 16PrSLW [ 10D ] 11
3B/15/IV 16PrSLW [ 10D ] 11
17 units 25,000 men Total Points 417


Points
Armee du Nord Ney 10"E(10)+3 49
II Corps II Reille 9"G(5)+1D [ 6F ] 25
Fifth Division 5/II Bachelu 3"G(7)+1 14
1B/5/II 16FrLN [ 8D ] 13
2B/5/II 16FrLN [ 8D ] 13
Sixth Division 6/II Jerome 3"A(4)+0 7
1L/6/II 16FrLT [ 8D ] 14
2L/6/II 20FrLT [ 10D ] 18
2B/6/II 28FrLN [ 14D ] 23
Ninth Division 9/II Foy 4"G(7)+2 16
1B/9/II 20FrLN [ 10D ] 17
2B/9/II 20FrLT [ 10D ] 18
VI Corps VI Lobau 9"G(6)+1 [ 5F ] 28
Nineteenth Division 19/VI Simmer 3"A(5)+0   8
  1B/19/VI 16FrLN   [ 8D ] 13
2B/19/VI 16FrLN [ 8D ] 13
Twentieth Division 20/VI Jeanin 4"G(6)+1 14
1B/20/VI 16FrLN [ 8D ] 10
2B/20/VI 8FrLN [ 4D ] 7
Third Cavalry Division 3C/VI Domon 3"G(7)+1 14
1B/3C/VI 12FrLC [ 6D ] 10
3C/VI Fr6# 11
Fifth Cavalry Division 5C/VI Subervie 3"G(5)+1 12
1B/5C/VI 8FrLC [ 4D ] 7
2B/5C/VI 8FrLC [ 4D ] 7
5C/VI Fr6# 11
Corps Artillery VI Fr6#   11
17 units 27,000 men Total Points  403

I helped the Prussian set up his columns with one being the I Corps, another the 15th Brigade, a small one being the 7th Brigade and a fourth column being the bulk of the II Corps.  Blucher and the recon cavalry would join the battle at commencement.

The French player determined his columns and from memory they were one for the 19th Division, one for the 9th Divison, with the remaining two the II Corps and VI Corps.  The 3rd Cavalry Division provided recon.

Unleashing the map movement on players who were totally unfamiliar with it (as well as not have a good feel for their troops and the Napoleon's Battles rules) was going to be interesting.   It worked well and was quick.  The things that took time were organising columns and subsequently the terrain.


In addition to the four columns per side there was one dummy each.  I had made up ten counters so thought they might as well all be used.  As it turned out the ones with the 4 and 6 dice on them were the dummies.  While the Prussians had intelligence, they weren't ready to declare battle, allowing Ney to seize his chance.  The three French columns in a line formed one half of the battlefield with their fourth column arriving on turn five in march columns on the road.

The Prussian column marked with the 1 would arrive on the first turn deployed.  The one marked with a 3 on the third turn in march column (as it was it deferred two turns so it could enter deployed).  It would be entering via the road on the Prussian's left flank.

This system of reinforcements is quiet different to Blucher and I based it simply on the number of Movement Points it would take the absent columns to get to the battlefield, with the benefit that those adjacent would be entering deployed.

The Prussians at the end of the first turn when their third column has entered.  It held the bulk of their forces and so was a very timely arrival.  The village of Duifel became the objective.  We went with minimal terrain, the hedges were just to show the road.

The French made for the bridge, but the stream was fordable.  The river however was not and effectively closed off one sixth of the battlefield.  The French had deployed cautiously on their right as they knew Prussians were coming.

The French started with their left flank on table but in march column.  This meant they quickly came to the centre of things, but needed time and space to deploy.

Everyone likes fighting in lines.  It is something I rarely do, providing the flexibility that you get with column movement.

Umpiring and rule explanation meant I missed taking more photos.  The Prussians got the better of the French right using Blucher to lead a number of attacks.  In the centre in the last turn Ney lead the French to victory in capturing the village.

The Scharnhorst system had set up an interesting battle that played out well.

Olivier lead the French assisted by Matthew, while Dave gained more experience as the Prussian, assisted by Stephen B as Ziethen and Gerry as Losthin.


Thursday, February 26, 2015

Along the Danube - First Play of Blucher

Last night, with just one read of a redacted set of the rules I attempted to umpire my first game of Blucher. Mark B took my French against Stephen N's Austrians in the introductory scenario for the new Blucher rules - Along the Danube.

I had made up some movement trays and labels to use with our miniatures that are based for Napoleon's Battles (mine) and Empire (Stephen).  The plan is to invest in some metal 3x2 inch bases which my troops at least will adhere to due to the wonders of magnetism and can also double as movement trays for Napoleon's Battles.

But this post is about Blucher.

Apart from the determination to play with miniatures I also researched names for each brigade and created my own labels/roster.  The resultant document can be found here and one of its two pages can be seen in the following picture.

The Austrians have deployed in a very linear fashion and are not yet revealed.  The French have deployed very compact.  There are more Austrians to the right and left of their line.  There are also more French to their rear.  The shining round things are coins denoting objectives.

The French advanced in the centre and came under fire from the Austrians who held their position.  One mistake we initially made was in not applying the penalty for infantry skirmish/long range fire.

The Austrians attacked with their Reserve Corps on the French right.  I used cotton wool balls to mark fire combats and close combats - for visual appeal and as an aide memoir.

On the third turn the French start to return fire in the centre and on their right.  They had repulsed one of the Austrian Grenadier brigades, but the other one was proving more resilient.  I have to double check, but don't recall any restriction on firing into a melee.

The centre fire fight continues, while the Austrians try again on the French right.  The Austrian's own right flank is advancing through the wood.  

The French start to break into the Austrian centre and have repulsed the Austrian attack on their right.

We played ten turns all up before calling it a night (approximately four hours casual play including set up and packing away).  We were close to a result.  The Austrians had four broken units while the French had two (and had retired two more).  However the French Reserve Corps was getting ready to exploit the break in the Austrian centre.

The movement system using momentum (MO) rolls worked well and was fun.  Most of the time each side got to move three corps, although the French lucked out badly on one occasion (although they were in a position to fire so it turned out to their advantage anyway). 

We didn't use reserve movement - something we are yet to learn.  I think it would have aided the Austrian right wing advance, provided they skirted the wood.

Also we might not have done the correct thing when units were engaged (I need to read that part again).

We did have a few units fatigued, but I couldn't find out what the penalty for that was (only reference I have found so far is on page 12, but it might be something in the advanced game that I am yet to study).

I need to do some more thinking on the aesthetics.  I find the labels detract from the visual appeal, but there are a lot of options and ideas to consider for alternatives (and two good ones are mentioned in the rules - put them underneath or use a roster).

I like the big bases and in fact, the basic mechanics of the game.  It is the kind of thing I would like to think I would have come up with if I had Mr Mustafa's talent for writing wargame rules.  Definitely simpler than what I am used to, but still with lots of command challenges and tension to make for an engaging game.

The rules are well written and laid out.  I was working from a PDF copy that hadn't printed well in black and white (most of the coloured headings and diagrams were just black rectangles), so it is a tribute to the rules that they survived that challenge.  (Aside: my hard copy rules and 100 Days Campaign arrived today - thanks Nic Robson of Eureka for such prompt service and Australia Post too).


Sunday, February 22, 2015

Preparing for Blucher

When I saw the post on the Mad Padre's blog about Blucher availability, I found it wasn't on sale in Australia and so ordered it from  J&M Miniatures.  Excellent service and saved me a heap (the Canadian maple leaf being close to the gum leaf in value), but postage via moose was the killer and even a second mortgage couldn't cover it so sadly I took James' suggestion and cancelled.

But I had to have the rules!

I got the PDF download from Sam Mustafa's site.  Hmmm, 170 plus pages in colour.  Cost me $14 or more just for a black and white copy to be printed.  But at least I had them.  I also now found they are available from Eureka here in Australia.

First impressions very positive, but playing with cards ain't going to work for me.

For my 15mm figures based for Napoleon's Battles, there is a very good fit to a 3 by 2 inch base.

My first idea was to make some movement trays from old CD cases (the soft plastic kind).

They worked okay, but it was a slow process, so I tried making some out of card.  Just cheap card left over from cereal boxes etc.  I recall making myself stuff when I was a kid this way, but then it was sellotape, now I have PVA glue.

I got a bit carried away painting the bases (they needed it to cover up the packaging artwork).

Then I thought, why not use coloured card.  It was cheap enough and this green, while bright in the photo, I believe will be a good match for the table top.  For artillery I will use two guns, I only just had one handy for this picture.

The other thing I've done in preparation for my first game using the Along the Danube scenario, was to give the formations names which I picked up from the Wagram OOB.  I've remade labels to this effect.