Thursday, October 12, 2017

WBTS via Vassal - Weeks 73 to 76

Winter has arrived.

The Union supply is 131 carried forward, plus 180 production plus 34 liberated towns.  Total 345 for 20 Personnel Points.

The Confederate supply is 94 carried forward, 60 from major cities, 6 from import, and 58 from towns: total 213.  This has to last for 5 months when town supply will be zero.  They have 30 personnel points.

The Union augment two 3-3s and one 4-3 to 10-3s and convert a 3-2 to a 3-3.  That leaves 277 supply.

The Confederates raise 10 militia and 10 garrison.  This leaves 183 supply.

The Union deploy a supply train, railroad repair crew and a siege train to Washington. A 10,000 man strong division goes to Bowling Green along with a supply train.  There are 2,000 militia for deployment later.  In a severe blow, the Union fail to give Meade an army command (this same set back had happened to Grant eight weeks previously).  The ironclad in St Louis completes fitout and is ready for action.

The Confederates deploy a railroad repair crew and supply train to Richmond.  They have 5,000 militia to deploy later.  Their side is joined by Wheeler, a cavalry commander, and by Smith who is given command of the Army of North Virginia.  No partisans appear.  1,000 militia walk off the job in Florida.  The ironclad at New Orleans is still being painted.

You have to laugh with the availability of Army HQs.  The Union get one on a 1-4.  They desperately need one.  The Confederates get one on a 1-3 and have an embarrassment of generals but no troops.

Union supply consumption is 54 and 12 rail.  That leaves 224 and 22 rail.  The Union top up their departmental depots.

Confederate supply situation is precarious due to limited rail this time.  They use 26 supply and 10 rail.  They have no rail left and 2,000 troops desert due to lack of food.  They have 157 supply left, but no rail capacity.  Supply is water transported to Forrest on the Mississippi.  Supply is provided to the new supply train in Richmond.

As usual, the Union are able to raise Kentucky militia in Bowling Green and Missouri militia in St Louis.

Week 73

The Union get the 1 chit.

Buckner is told to take a 1,000 men back to Atlanta and take charge (his corps will provide him with a useful command span).  He leaves 10,000 men with A Hill which is the maximum amount of troops you can have, but still stay in the least risk column of requiring supply if you are in combat.

The new supply train is sent to Breckinridge and Smith then sets about pulling up rails to repair the line to Petersburg.

The small division in Wilmington is pulled out.  It's 3,000 men are needed elsewhere.

The rest of the Confederate generals stay put, waiting to see what the Union do.

Farragut assembles the Union river fleet at Cairo.  While on the east coast Porter takes an ironclad up the Appomattox River and destroys bridges linking Petersburg.

McClellan is ordered to join McPherson in Charlottesville.  All other Union maneuvers are going to be down to initiative.

Meade gets the rail repair unit moving, sends reinforcements to Lyon and then moves to Culpepper.

Lyon does nothing, although the Richmond Chronicle writes this up as "Lyon crouched in wait".  This leads to the paper's editor being arrested for displaying "negativity to the cause".

Hooker scouts about, waiting for Halleck to join him.

Pope stirs, but has nothing to do.  He finally twigs that he should go back east.

Grant goes up the Tennessee to be opposite Pittsburgh Landing, leaving Crittenden to watch Jackson.

There are no attacks, although the Union have identified many targets.

Week 74

The Union get the 5 chit.

Buell is ordered back to Union City.  Farragut takes his massive fleet down to Pittsburgh Landing and blasts the Confederate garrison to smithereens.  The supply train and 10,000 men are railed to Waverly from Bowling Green (which conveniently has two rail lines out to the Tennessee at that location).

In the east a 4,000 man strong division is ordered from the mountains to Staunton.  McClernand is then given a job to collect dispersed troops as well as to reinforce McClellan.

Meade gets ready to attack.  Lyon pushes up the York River.

Halleck seizes the initiative and crosses the Chattahoochee, joins Hooker and together they march on Columbus, GA.

Grant crosses the Tennessee and occupies the devastated fort at Pittsburgh Landing.  Sumner moves to Ironton, MO, where there are 4,000 militia that could be put to use elsewhere.

Meade fails to attack, but McPherson does.  His part of the Army of the Potomac engages the part of the Army of the Atlantic lead by the newly arrived Wheeler (who matches McPherson).  The combat is on the 131-160 column of CRT 3.  The Union use supply and inflict 10% casualties on the Confederates.  Both sides lose 3,000 men.  McPherson's hat was shot off his head and he was knocked from his horse, but he got up, brushed himself down and lives to fight another day.

The Confederates take a gamble and order Beauregard to hold his position.  He sends Wheeler and the cavalry to hold his left flank (it's a bit convoluted as Wheeler can't yet command the vacant cavalry corps HQ).  Smith and the Army of Virginia set to repairing bridges near Richmond.

In the West Jackson pulls back.

The Thin Grey Line

In the West the Union finally made some progress.

In the South neither side can do much, but the advantage is with the Union.

Week 75

The Union get the 5 chit again.

Franklin is activated to send reinforcements to Lyon and a supply train and 7,000 infantry are dispatched and safely arrive.  McClernand is ordered to redeploy troops to replace those sent by Franklin to Lyon, repair the railway to Leesburg (it's the thought that counts), send troops back to Baltimore for future augmentation and then head to help Meade.

Banks is ordered to secure a crossing of the Alabama River (of little immediate benefit, but in the future, who knows?).

Farragut takes his fleet back to the  Mississippi.  Crittenden crosses over the Tennessee and Buell goes to meet him.  (This rendezvous being what Jackson was afraid of, but it happened much sooner than expected).

Sumner and McCook, although they could do stuff, do nought.  At least Halleck and Hooker are having a chat, trying to decide what to do next.

Grant goes to confront Jackson.

Pope sends reinforcements to Meade.

Lyon threatens Taylor with a march attack forcing him to fall back.

Meade doesn't attack, but McClellan does on the 401-900 column of CRT 1 against Wheeler and the Confederate cavalry.  Both sides lose 1,000 troopers.  Wheeler almost loses his hat.

Lyon attacks, but Taylor falls back again.  Lyon does not advance.

Grant doesn't attack.

The Confederates order Bragg back to Hanover Junction to protect Richmond and avoid getting cut off.  Cavalry is sent to block any Union incursions through the Wilderness.

Forrest is ordered to send reinforcements to Jackson.

Smith on his own initiative, repairs the railway at Petersburg.

The rest of the Confederacy stands firm.  Militia are raised in Fredericksburg, VA and Memphis, TN.

Week 76

The Union get the 2 chit.

I must admit I find it is very hard to know what to do with the Confederates.  Lots of generals, very few troops (although there are 40,000 infantry arriving next week).

Bruckner is ordered to Atlanta.  An empty corps is sent to Athens, GA, where it will collect some militia.  Everywhere else is eerily quiet.

Halleck orders Hooker to cut a rail line and then pull back to maintain supply.

Buell is order to go to Grant's aid and fight Jackson.

Sumner, Banks and McCook have a rest, but Grant gets busy using his cavalry to scout all around Jackson's army.

McClellan realises Wheeler no longer exerts a cavalry zone of control, but he does nothing.  McPherson wants to, but needs to get ready for an attack.

Lyon conducts a march attack on Fredericksburg, both sides lose 1,000 men.  But it's a disaster, Lyon's old wound reopens and he will be out of action for five months.

Meade again fails to attack, but McClellan does.  It is on the 900+ column of CRT 1.  The Confederate lose 1,000 troopers.  Wheeler retreats towards Lynchburg.  McClellan doesn't advance (he's at the limits of his supply lines).

Buell orders Grant to attack.  He does so on the 251-400 column of CRT 4.  The Union use 2 supply and Grant wins a stunning victory, inflicting 50% casualties on Jackson.  The Union lose 3,000 men (5%) and the Confederates 10,000.


Wheeler has 2,000 cavalry; Beauregard 23,000 men; Hill 11,000; Taylor 1,000 cavalry; Bragg (the incorrectly labeled Johnston counter) 22,000; Hindman has 18,000 in Richmond; and Smith has 4,000.  Total 75,000 men.

McClellan has 35,000 men; Meade 32,000; McClernand 36,000; Pope 4,000; Franklin 21,000 and Lyon's corps (the XVI or 16th) 17,000.  A total of 145,000 men.  Then there are all the scattered units...


In the South the numbers are in the Confederates' favour, 21,000 to 14,000, but they are dispersed covering a large area.


In the west the Union have massed 70,000 troops.  For the Confederates, Forrest has 14,000; there are 13,000 in Memphis and 10,000 remaining with Jackson.

Casualties


Union lost 7,000 to the Confederates 22,000.


Burgundians versus Lancastrians

A club league game where my Burgundians sit and wait the Lancastrians.

 Oh dear, on my CinC's first roll he is downgraded.
I guess it is tempting fate too much to start with a general rated as a genius.

 My whole army sitting on opportunity, 
watching the enemy who are likewise sitting on opportunity.

 Fate can be cruel.
On my CinC's next role he gets upgraded, 
except he can't as he's already been downgraded.

 The Lancastrian's start to move their right flank.
I plan to move my left flank knights to my centre and then launch a devastating charge down the gap between the two fields.

 My knights take a while to get moving
Meanwhile I advance my archers.

 Shooting starts and it does not go well.

 This is going to be tricky

 On the right the shooting is also not going well for me.

 The Burgundians as seen from the Lancastrian side.

 My knights are off,
but I've miscalculated and the gap narrowed just enough to disorder the left hand band of knights.
As it was, their second move failed anyway...

 My knights struggle on.

 My right wing came off much worse in the shooting.

Glory!
The knights rode down three enemy units.

Sadly it wasn't enough to win the battle, but at least it was a lot of fun.

Sunday, October 8, 2017

Launch of the Quinquereme

I had made this model some time ago.  I didn't do as good as job on it as I had on its smaller companions which I attribute to the larger size being a bit more unforgiving when cutting and glueing.  Once I finished it I decided to add the officer's tent.  Then there was a further delay while I added a tower.  Still more delays while I built a corvus.

 In full sail

 Equipped for fighting

 The corvus actually works, if there was any red fleet ships to board.

Bursting with troops.
6mm Rapier miniatures after a stunning paint job by Mark Woods.

I've some crew figures to paint, but I have yet to settle on how I want to base them.  I am sure the inspiration will come.

6mm Cuirassiers

One day Mark Woods decided he wanted to try painting some 6mm French Cuirassiers.  He did a magnificent job, but said something like "never again" and passed them on to me.  I just had to base them.  Of course I couldn't help but fit them out with some new all red plumes and dark blue portmanteaux.


Saturday, October 7, 2017

WBTS via Vassal - Weeks 69 to 72

The Union carry forward 72 supply, receive 200 from production and 64 from newly enlightened towns.  A total of 336 for 30 personnel points.

The Confederates carry forward 84, receive 60 from major cities, 2 from imports and 108 from secessionist towns.  A total of 254 for 40 personnel points.

The Confederates augment a 3-3 and a 4-3 to be two 10-3 divisions.  They create a 3-4 cavalry division, 8,000 garrison troops and call up 5,000 militia.  This leaves them with 190 supply.

The Union augment three 3-3s to 10-3s, create two supply trains, commission a naval flotilla and raise 2,000 militia.  They have 191 supply left.

The Confederates deploy 5,000 garrison troops to Richmond.

The Union deploy a 10,000 man division to Washington, where it is reported to have gone straight on to waiting transports.  A naval flotilla is launched on the east coast.  Both the Union and the Confederate ironclads are still under fitout.  It is believed the same tailor is vying for the contracts to provide the cushions and essential items of haberdashery.

Partisans appear outside Nashville.

The Confederates actually build a fort at Fort Pillow.  This reduces their supplies to 140.

There is a leader exchange (my bad, I should have done this earlier) and Burnside is swapped for Price.  Price retires to Raleigh and is given command of a corps.

Meade and McPherson join the Union and appear in Washington in command of Corps.  Burnside goes to Baltimore and also receives a corps, his job will be to organise the scattered forces in Maryland.  McPherson will go to the valley and pick up Keyes' troops.  Meade will organise sending troops to Lyon.

The Union consume 43 supply and 8 rail.  They are left with 148 and 32 rail.  With the Confederate Fort Pillow now being a real fort, supply to Marion is blocked and the troops there perish.  17 suply are broadcast to replenish depots.

The Confederates consume 38 supply and 12 rail, leaving them with 102 supply, 12 rail.  8 supply are broadcast to Jackson's supply train using 8 rail.

Kentucky militia are raised in Bowling Green and Missouri militia are mustered in St Louis.

Week 69

The Union get the 1 chit.

Buckner is railed across the Flint River in an attempt to block Hooker.  Tyler is ordered back to Richmond.  The partisans in Tennessee cut one of the rail lines and then head to Pulaski.  This puts Crittenden and Banks out of supply.

Jackson decides that with winter coming he is best off keeping close to Memphis.

A Hill in Atlanta has a sizeable army, but no supply train or corps.  He can't decide what to do.  All the other generals out west are either without men or best left where they are.

Breckinridge is suddenly nervous, he sends an empty corps off to help A Hill.

Pleasanton is ordered to the east bank of the Duck River and told to get those partisans.  He first repairs the railway bridge.

Grant plans to move up the Tennessee, but makes no move.  Buells and Banks do nothing, but Crittenden chases the partisans out of Pulaski, but being cavalry they melt away.

Hooker marches north and captures Fort Gaines after doing a march attack on the troops there, with both sides losing 1,000 men.  Halleck needs to get moving to come down and rendezvous with him.

Lyon takes a stroll around Hampton.

McPherson moves to Winchester and takes over the late Keyes' troops.  Meade sends Lyon 10,000 men.

Burnside, now free from captivity, thinks about getting back into the saddle, but that's all he does.

Will McClellan attack?  No.

McPherson attacks, however, hitting Longstreet on the 251-400 column of CRT 3.  The Union use supply, the Confederates need supply, but don't have any.  The column shifts to 401-900.  The Union lose 3,000 men (10%), the Confederates lose 4,000 (40%) but due to their supply problem this is doubled to 8,000.  They are all but wiped out.  Longstreet narrowly escapes being wounded and retreats with his remaining 1,000 men.

Not to be out down, McClernand attacks.  He is on the 161-200 column of CRT 2.  No supply is used.  Both sides lose 1,000 men.

Crittenden attacks, but the partisans again slip away.  I now realise I moved the partisans over bridges controlled by the Union.  I also assume partisans cannot "own" land or change ownership except for the time they are physically occupying a hex.

Partisans in Tennessee


Week 70

The Union get the 4 chit.  Goodbye Longstreet.

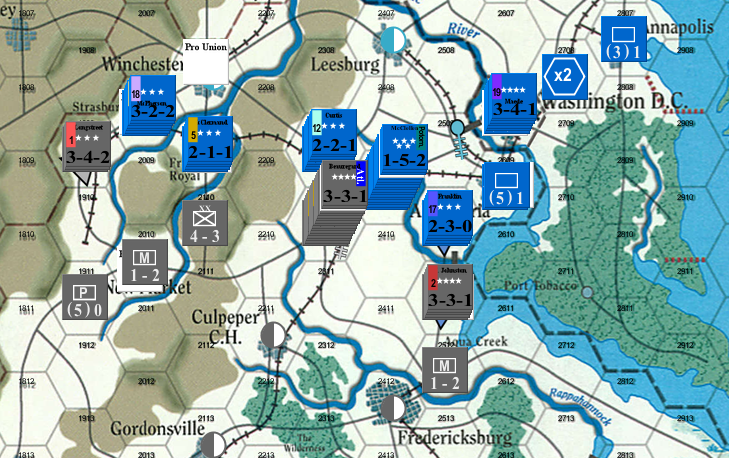
The situation in the Valley before the Union move

McPherson sends a brigade of 2,000 men to secure Front Royal in the expectation that McClernand will be following him down the Shenandoah Valley (or is it up the Valley?).  He then gets after the retreating Confederates with a march attack.  It is on the 900+ column and the 1,000 Confederate are eliminated for no loss.  Longstreet and his now empty corps is displaced and he realises if he goes down the road it is the end of the line.  So he jumps over the river and heads for the hills.

McClernand makes a dash for New Market.  The forced march costs 4,000 men, but New Market is captured for the loss of another 1,000 men (equalling the rebel loss in that important location - it acts as a supply source).

Halleck is told to head down the Chattahoochee and meet up with Hooker.

Pleasanton is told to eat a hearty breakfast and then go get those partisans.  The subsequent march attack sees the partisans destroyed, but for the loss of a 1,000 troopers.  However, as Pleasanton is sitting down to write his report, a Southern fanatic rushes up to him and stabs him through the heart.  This is the third fatality for the Union side (although nothing compares to the death of Lee on the Confederate side).

Grant doesn't feel like moving.  Does he possibly have a hangover?

Crittenden stays put as well, as does Banks and no one even bothers to ask about Pope.

McCook gets the railway line repaired.

Buell cowers by the banks of the Mississippi.

Sumner gets moving in Missouri. He positions himself between Ironton and St Louis, well placed to react to any partisan activity should it eventuate.

Hooker, hearing that Halleck is coming to join him, doesn't move from Fort Gaines.  Maybe he is watching out for what Bruckner might do?

Lyon advances on Richmond.  He has a supply problem, but he has a plan.

Burnside is sulking in Baltimore.  The Confederates had said he was going to command an army.  Instead he finds himself in charge of a desk, and it's not nearly big enough!

McClellan stirs, pushing Franklin's Corps between Beauregard and Bragg.  But will he attack? No.

Keyes old corps is disbanded (saves me trying to work out if Longstreet and his empty corps are affected by it).

In the east the Confederates are in trouble.  Bragg is ordered to pull back to Fredericksburg.  Beauregard falls back, but is not sure where to stop.  He sends some cavalry to slow the Union in the valley and positions himself in Gordonsville.  There is no word from Longstreet who is hiding out in the Massanutten Mountains.

Taylor takes the initiative to reinforce West Point, having guessed that Lyon might need to make that place, with its access to port facilities, a supply base.

Hindman pulls back to defend Richmond.

Hill heads down the Chattahoochee shadowing Halleck who is on the opposite bank.  Bruckner is stuck looking for his train ticket, having been delayed by an over zealous conductor.

Jackson thinks about confronting Grant before he can meet up with either Buell or Crittenden.  Trouble is he has only 22,000 men to Grant's 24,000.  He does it!  Later he fails to attack.  The old taunts of "no action Jackson" come back to haunt him.

Forrest sends cavalry to recapture Marion.

 On to Richmond!

The Hook Up

Week 71

The Union get the 1 chit.

Beauregard decides to send D Hill back to Culpepper Court House, again just to delay the Union in the unlikely event that they advance.  This also allows the 4,000 men from Front Royal to rejoin the Confederate army.

Bruckner is ordered to Columbus.  He hopes to meet up with D Hill, but the latter is unexpectedly delayed.

A Johnston pulls the cavalry back from Marion and into Memphis.

Jackson attacks!  It's on the 91-110 column of CRT 4.  The Confederate stock up on ammo, the Union fix bayonets.  The outcome is horrific.  The Union lose 25% of their army, 6,000 men.  But for the Confederates the losses are much higher, 9,000 men, 40% of their army.  Jackson narrowly avoids being killed, by his own men.

Longstreet, now known as Lostreet, burns his Corps' papers and prepares to be captured.  This will stop the Union from getting a political point, but...  I'm going to rule that the actual destruction of all the troops in the corps represented a decisive victory [25.31].

The Union tell McClellan to go get those Rebels while they are on the run.  He pushes Curtis across the Rappahannock and Franklin down to Aquia Creek.  He then takes the cavalry and storms into the valley, forcing the rebel cavalry to retreat.

McPherson provides a brigade with a packed lunch and sends them off to the mountains to apprehend Longstreet.  They find him sitting quietly under a tree, waiting for them.  There are only so many nuts and berries a general cares to eat.  McPherson then takes the rest of his army and overwhelms the Confederates at Staunton (the other supply source in the valley).

None of the other Union generals in the east make a move except Lyon who attempts to storm into West Point.  He is stopped, but not before 1,000 men perish on each side.

Hooker gives up waiting for Halleck and destroys the rail connection at Fort Gaines before moving to Albany and doing the same there.

Crittenden forces marches to the Tennessee, 1,000 men are lost in the process.  Grant force marches to meet him and loses 2,000 men.  No one else in the West does anything.

In a bloody affair Lyon attacks across the York River and seizes West Point, inflicting 1,000 Confederates casualties, but losing 4,000 men in the process.  At least he now has a place that can be used to land supplies and perhaps reinforcements.

Week 72

The Union get the 4 chit.

McPherson is ordered to Charlottesville where he cuts the railroad.

Over in the West, Banks is ordered to the Alabama River which he reaches near Blue Mountain.  Halleck is told to keep heading down the Chattahoochee, which he does, reaching Eufaula, which he discovers is misspelt on the map.   The 1st Cavalry Corps is sent to Savannah, TN, on the Tennessee river opposite Pittsburgh Landing.  It is hoped that Grant can make some use of it.

As it turns out, none of the Union generals in Tennessee feel like moving.  The weather must be bad.  Maybe it's gonna be a harsh winter? 

Hooker moves back to the Chattahoochee and is now on the opposite bank to Halleck, exchanging pleasantries.

Lyon conducts a march attack against Taylor, capturing Urbana.  Both sides lose 1,000 men.

Both Curtis and McClernand are itching to do something, but it is best that they stay where they are, keeping the rebels hemmed in.  Burnside finally comes to his senses and starts to do the job required of him, collecting all the Union troops scattered across Maryland.  It will be a long job.  Meade stays in Washington expecting a promotion.

Lyon attacks, Taylor's residual troops are wiped out.  Taylor flees but Lyon stays put, conscious of his supply situation.

Curtis attacks D Hill at Culpepper Court House on the 201-250 column of CRT 2.  He didn't need supply, but the Confederates do, but they don't have any.  The battle shifts to the 401-900 column. The Union suffer 5% casualties (2,000 men).  The Confederates lose 20% which, given their supply situation, comes to 8,000 men.  Curtis is wounded and out of action for 11 months, but he has done his country proud.  The Confederates retreat.

Beauregard thinks about counterattacking the now leaderless Union force at Culpepper, but that would leave McPherson in his rear.  Retreating is risky as not all forces can be guaranteed of moving.  He finally settles on using his cavalry to screen the Confederate position.  It will be winter, Confederate reinforcements are coming, they just need time.

A Hill completes his move to join Bruckner.

Jackson thinks about retreating, but can't make up his mind what to do.

Everyone else stays put.

Grant and Jackson in Tennessee standoff

 Chattahoochee hook up.

 The blue cloud coming down on Richmond.


Casualties


This month the losses on both sides were 25,000 men. 

Romans

I am now nearing the end of my quest to field a Roman Army to fight my Ancient Britons.  These 12 figures complete all the legionnaires I need for a Marian Roman Army, only issue is they have the wrong shield shape.  I'm not so concerned about that as they also double up for the Early Imperial Roman Army.  More importantly I wanted to use the Airfix Roman figures as is (even though I've repositioned the shields).


To finish the Marian army I need two stands of light infantry.  Figures have been selected and conversion is about to commence.

For the Early Imperial army, the same psiloi are required, and to do the full list some auxilia (but I'm thinking of just using the archers I have painted and based, although I do have a more auxilia type figures identified for conversion); a warband, but have to be careful if I just use the Ancient Briton figures; a light horse stand, which I have, but may not be perfect; and an artillery base, which might be fun to scratchbuild, but might be more sensible to buy (or at least look to see if the option exists).

Plus I need two camps. 

Then I will be ready for DBA in 20mm or 1/72nd scale.

Thursday, October 5, 2017

Success on the third attempt

Last night at the club I enlisted Mark B as the Prussians and Stephen N as the French to do a further test of built-up area (BUA) fighting in Napoleon's Battles.

One regiment of Prussians started deployed in one village,
while a second regiment was ready to move into the other village.
Two French division were tasked to take the villages.

The BUAs would provide a +2 combat bonus for deployed units that were not disordered.  They counted as rough terrain due to the presence of the stream running through them.

 End of the first turn and there was some fire combat, but no melee.
Both sides had a unit contesting the eastern village.

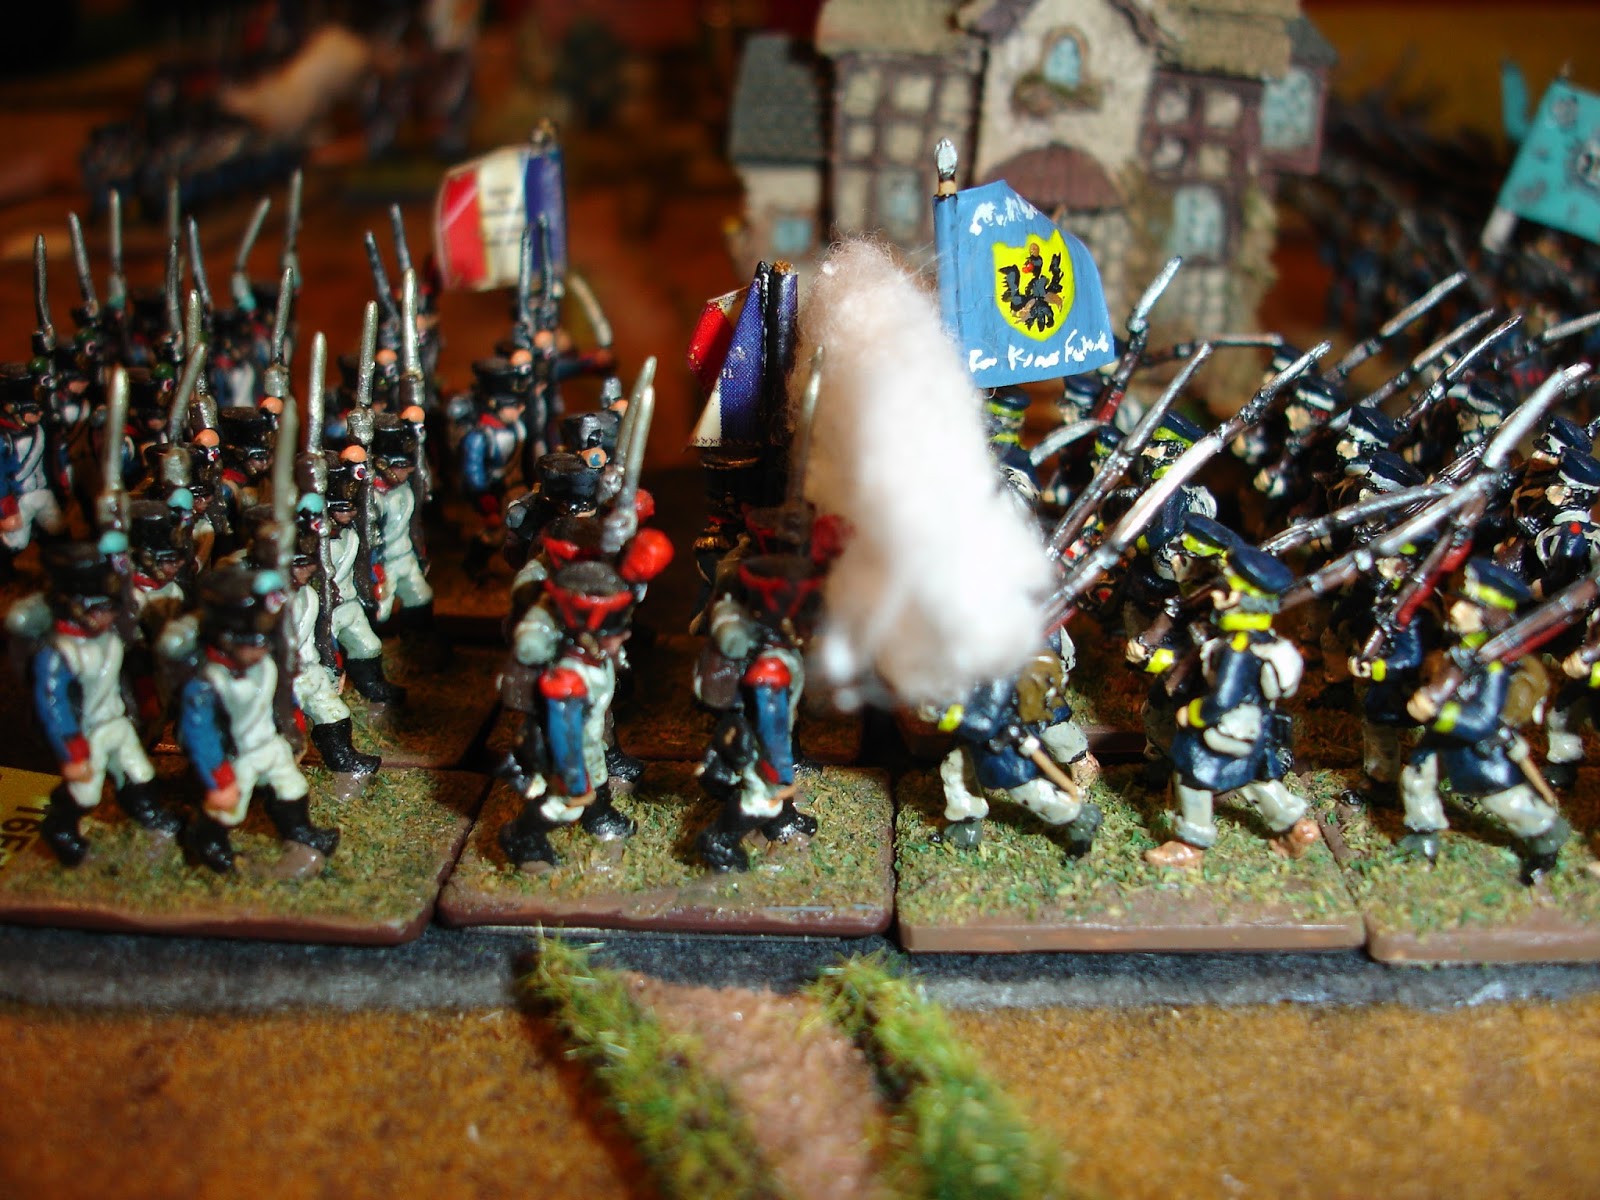
 The French attacked in the eastern village where both sides were in column.
They successfully withdraw after becoming disordered.

 In the western village the French deployed their light infantry brigade into line and attacked.
It was dispersed when trying to withdraw when it took an extra 4 casualties after suffering 3 casualties in the close combat and 1 casualty in the previous turns fire combat.

 The Prussians attack the other French brigade contesting the eastern village.
The Prussians are routed.

End of the second turn and the Prussians still hold the western village,
but the eastern village is being fought over.
The Prussians have some reinforcements.

 The French attack the western village.
They are successful.

 The French have occupied the western village, but are disordered.
The disorder represents the confusion caused by house to house fighting and also the distance the unit has had to notionally travel to clear out the enemy from the BUA. 
The Prussians counter attack, but are severely repulsed.
While the French were disordered and did not get the advantage of the BUA's combat modifier, they did count as being in line (deployed for fighting).

 End of the third turn and the French now hold the western village.
The eastern village has seen some fire combat, but that is all.
The French have received reinforcements as well.

 The French attack the Prussians in the eastern village.
The French are pushed back, but still cling to the village.

 End of the fourth turn.
The Prussians have been trying to rally their men for more attacks.

 End of the fifth turn.
The turn just saw some ineffective shooting, but the Prussians are now in position to attack.

 The Prussians attack the French in the eastern village.

 And in the western village.

 End of turn six and the Prussians have recaptured the western village.
The eastern village remains contested.

 The French launch a counterattack on the western village.

  End of turn seven.
The French have captured the western village again.
But have been thrown out of the eastern village.

I was very happy with the outcome, plenty of two and fro action and testing of both fighting in BUAs deployed and as just a bit of terrain.

Wasn't so happy with the withdrawal rule.  I think it should be considered part on the melee combat. 

Also used a house rule that allows for position of friendly commanders after all friendly combat units have finished moving.  This stops command units unnecessarily blocking troop movements.