Pages

Thursday, May 29, 2025

Stolberg Corridor - Observations

Ever since I acquired the Command Decision rules that contained a campaign for the Stolberg Corridor, it was a project I wanted to do.  This has now been completed using the Rommel rules and worked well.

The campaign I created using the base material, additional information and adapting for the Rommel rules had a few challenges and this post is based on these and other observations from the game. It also serves to provide closure and to publish the scenario.

Given the 15mm scale and ground scale of one hex is 1 km there would always be a need for some suspension of disbelief, but in looking at the images the labels are a bit too obvious unfortunately.  They could probably be smaller and on a darker base.

The Rommel rules worked well over a nine-day campaign game although we stopped after day eight, nine sessions in total.  The games changed over time and were also made interesting by the need to plan for the next day.

The rules for pillboxes and dragon's teeth also worked fine.

The use of ops dice to provide support points at the end of the day also worked out fine.

The reduction in available tactics was okay, but events could possibly need some tinkering.  

The size of the battlefield was manageable.

I have updated my documents for this scenario, and they can be found here:

    Stolberg Corridor Campaign for Rommel

    Stolberg Corridor Campaign Labels

The AAR for each session can be found in these posts:


Wednesday, May 28, 2025

More Rescued French Napoleonic Infantry

Not sure of the brand, but they had a Minifigs feel about them.  On the base of the infantry figure is the code 30F while the flagbearer has the code 25F which the drummer also seems to have (maybe reflecting a command set?).  The Napoleonic 15mm Wargamer | Facebook consensus was Minifigs.

I rebuilt one flagpole and was going to replace some broken bayonets but thought better of it.  They look good as they are.


I was particularly taken with the drummer trudging along.

My camera really brightens the blues.


UPDATE

Thanks to James we have the definitive reference for these figures.


Tuesday, May 27, 2025

Assault on Gallipolli Again

After our previous game we both had some new strategies to try out.  The ANZAC landings got delayed due to beach congestion caused by Turkish remnants rushing to block them.  They were eventually cleared and three victory locations secured.  The game then settled into a battle for Gaba Tepe (bottom left-hand corner).  The ANZACs would blow the Turks away only to have the Turks sneak reinforcements into the area in the nick of time.

It certainly was a fight to the death,
although I didn't need to play that card in the end.


Monday, May 26, 2025

Thematic Byzantine versus Later Abbasid Arab

In a Basic Impetus 2.0 Great Battles game were all the players are called Mark.  Mark B was the Byzantines, and the other Mark was the Arabs. I played God, although I did not declare my favoured faith - the dice decided!

Arabs on the left, Byzantines on the right.
Very similar armies in composition and deployment.
A patch of difficult terrain one on side of the field
and some broken terrain at the other

The Byzantines send their superior light cavalry forward to attack the Arab wings.

It doesn't get off to a good start.
The firepower of the Arab medium cavalry is a bit too much,
especially on the Byzantine right.

The cavalry combats continue as the Arab centre starts to slowly advance,
after brushing aside some Byzantine skirmishers.

The Byzantine cavalry seems to be in trouble.

The Byzantine right flank has broken,
but their left flank has recovered from its initial set back.
In the centre the Byzantine archers are pouring arrows into the advancing Arabs.

With what looks like half their army routed,
the Byzantines are really in trouble.
It is down to their infantry to hold until their cavalry
can crash into the Arab right flank.

But the Byzantine losses have been too high and their morale breaks.


Thursday, May 22, 2025

Later Seleucids versus Early Swiss

A good thousand years separated my army and Rob's Swiss.  How would things go?

The Seleucids found the Swiss deployed behind a difficult area on the left
and a broken patch in the centre.

Best to wait,
but maybe the skirmishers could do some damage?

A slight step forward and attempt to get the chariots moving
after the Cretans successfully shot up the Swiss light horse.

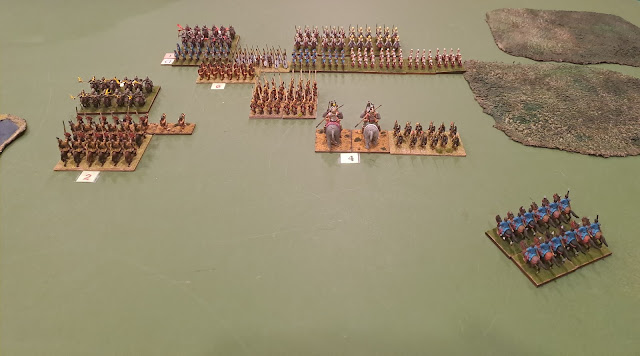
The elephants supported by the Thureopkoroi were unable to hurt the Swiss Halberdiers,
but the chariots proved very spikey and successfully repelled an attack.

The Swiss attacked but bounced off the Seleucids.

But they weren't put off and charged again,
with slightly better results.

The chariots are having a merry time riding around doing nothing.
The Seleucid general with his cataphracts have done well,
but the elephants were forced from the field.
The real fight is between the Seleucid phalanx
 and the Swiss general and his halberdiers.

And a fight it was!
Are the chariots in striking range?

Yes, but they did no damage.
However it didn't matter,
the Seleucid phalanx had fought the Swiss to a draw.


Wednesday, May 21, 2025

Assault on Gallipoli

Another new game to try with Richard.  Given I hadn't read the rules and was playing the ANZACs it worked remarkedly well.  Reminded me a bit of the Stalingrad game, but with cards for random events/bonuses and an interesting combat system.

Set up.  Beautiful looking game.
Coloured cubes represent victory locations.
ANZACs need six to win.

Units become exhausted after they move or take hits.
Then there is combat which is about to occur in the above image, round The Nek and the Sphinx.

Turn three and the ANZACs look like they have won,
but one combat remains.
The critical two cube area.

It was close, but the Turks wrested it back,
a good point at which to end the test game.
Looking forward to playing it again.


Tuesday, May 20, 2025

More letting Go Of Figures I will Never Finish

A friend is passing on a massive collection of 25mm Minifigs ancients and I thought I would add these into the hoard/horde.

Parthians

A mix of cavalry here, including some generals.

Another mix, thankfully I only got as far as removing the base from one horse.

Phoenix Cretans, with Greek javelinmen and some Romans.

At the same time I also let go of the figures featured in these four posts:

Thursday, May 15, 2025

Later Seleucid versus Palmyra

Same general location around Syria, but a few hundred years apart.

Curtis assisted me with the Seleucids (which included some of my latest units) in battle against John and Brad and their new Palmyran army in its first outing.

For this AAR I took a photo after each impulse, rather than one per turn (two impulses)

The Seleucids were out scouted,
but found favourable terrain.
A lake on their left and difficult ground on their right.

First turn and the Palmyrans send their light cavalry forward.

The Seleucids attempt to catch them but miss, becoming disordered.

Second turn and the Palmyrans cavalry fire and retire.

The scythed chariots charged but collapsed after the Palmyrans delivered some defensive fire.

The third turn and the Seleucids got the initiative and advanced,
their cataphracts charging into the enemy.

The Palmyran cataphracts try a countercharge, but the Seleucid horse hold.
The same cannot be said for the Arab archers covering the Seleucid right flank.

The fourth turn and the Palmyrans are now threatening the Seleucid's rear.

The Seleucid cataphracts have been repulsed.
The imitation legionnaires have become engaged and the phalanx is inching closer.
The thureophoroi have about faced to cover the right flank.

Turn five and one unit of Palmyran cataphracts has perished before the Cretan archers.
The Seleucid right is suffering under massed bow fire from the Palmyrans.

The Seleucid phalanx has pushed the enemy back but failed to pursue.

Turn six and the Seleucids continue to advance.
Their cataphracts have rejoined the fray,
the phalanx has continued to push forward
but again failing to follow up.
The elephants are getting close,
and even the thureophoroi are looking threatening.

The Palmyrans keep shooting.
Their cataphracts have prevailed but failed to follow up.

Turn seven and again the Seleucids surge forward,
the phalanx again just failing to rout the archers to their front,
but the elephants successfully stomped on their opponents.

The elephants success was short lived.
The cataphracts are fighting it out to the bitter end.
At this stage each side is one unit away from breaking.

Turn eight and the Palmyrans try to shoot their way to victory.

But victory goes to the Seleucids as their cataphracts succeed 
while the phalanx again fails to deliver.